Versions Compared
Key
- This line was added.
- This line was removed.
- Formatting was changed.
Overview:
Provide a procedure to install and configure This guide provides instruction on configuring both Medical-Objects Capricorn and Best Practice software to import electronic results. Document the process for configuring application acknowledgements.
Installation and Configuration of Capricorn Software
Download the latest Capricorn from the following link.http://download.medical-objects.com.au/
The link on the download page looks like the following:
The following window will appear:
note
.
exe
If
Once you have clicked Save, the following download screens will appear
After it has been downloaded, click Run. If a Security warning comes up again, Click Run Again.
Click Next.
Click Install.
The following window will appear.
The Setup wizard is now complete.
Registration Process
Once the setup is complete you will need to enter the Token or Serial key provided by the Medical-Objects help desk.
you require any assistance with the installation or configuration, or if you have any questions, please contact the Medical-Objects
help deskHelpdesk on (07) 5456 6000.
From the email, copy the token and click the Paste Token link.
| Note |
|---|
This will automatically fill in the Registration Token for you. |
Click I Agree.
The PGP Key Generation Window will then appear.
Enter pgp in lowercase into both fields. Then click Next.
The following window will appear.
Click Finish.
| Note |
|---|
The main installation of the Medical-Objects Capricorn is now complete. The HL7 Tray icon will now be shown in the system tray located at the bottome right hand corner of the desktop. |
Configuring Capricorn Software
| Note |
|---|
If the Caproicorn HL7 tray icon is not visible, Open Capricorn from the Start Menu > All Programs > Medical-Objects > Medical Objects Capricorn or from the C:\MO\Capricorn\Capricorn.exe. |
| Code Block |
|---|
C:\MO\Results\BP\Acks |
| Note |
|---|
If the folders do not exist you must create them. Make sure the results folder has Modify, Read and Write permissions, AND is shared on the Network. |
Select Server Parameters from the left panel.
| Code Block |
|---|
C:\MO\Results\BP\In |
| Note |
|---|
If the folders do not exist you must create them. Make sure the results folder has Modify, Read and Write permissions, AND is shared on the Network. |
If you have not Installed the Medical-Objects Download client, Please see the guide for Installing Capricorn on Windows.
Pre-Configuration Checks for Best Practice
| Note | ||
|---|---|---|
| Warning | ||
| ||
| Important: Best Best Practice import and acknowledgement file path configuration MUST be completed on the server (Machine that runs BP Link). |
| Note | ||
|---|---|---|
| ||
RDP RDPConnections must NOT be used to configure import and acknowledgement file paths in Best Practice, as Best Practice may interpret the settings as being entered from the PC which the RDP session was created from. |
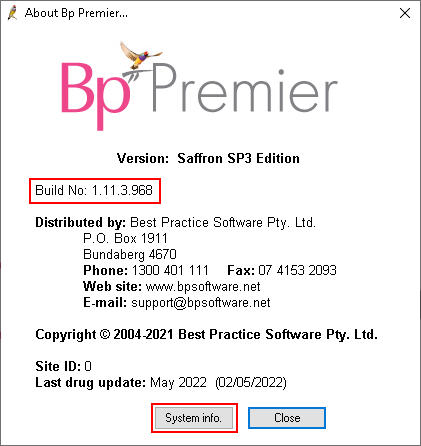
- To ensure you are sitting at the server, open Best Practice and click on Help then About which will open the About window.
Image Removed
Image Added
- On the About window, click on window note the Build No then click on System Info.
Image Removed
 Image Added
 On the System Information window, please locate the following items from the left hand list and make sure their corresponding value is correct.
Installation Type = Server
Database Server = (local)
Remote Session = False
Image Removed
Image Added
pleaseInfo title Note: If you are unable to locate or connect to Best Practice on the server in the console session,
pleasePlease contact your IT Support personnel or
call the Best Practice Helpdesk on (07) 4155 8800.
Do NOT continue configuration if you are unable to access the server.
Configuring Best practice to Import Results
1. Open the Best Practice software.The Configuration window should be displayed.
Select Results Import from the left panel.
Click on the Add button to browse for the folder created earlier to import results.
If possible, Use A UNC path.
| Code Block |
|---|
eg: \\Results\BP\In |
Click OK.
The Send Acknowledgements window will appear.
Add MEDICAL OBJECTS as the Facility name (include the space).
Click the file browse button to select the folder that was configured in Medical-Objects Capricorn earlier. Again, Use a UNC path if you can.
| Code Block |
|---|
Eg: \\Results\BP\Acks |
Once you have selected the path click OK.
Repeat steps 10 to 14, but this time using Mater Laboratory Services as the facility name for all Queensland practices using Best Practice. Please also setup a rule for all NSW & Gold Coast practices using Best Practice for NSW Health using their HPI-O number as the facility name. Browse to the same folder used in step 13.
The Configuration window will now appear.
Click Save to save and close the window.
| Note |
|---|
The acknowledgement process from step 10 to 16 will have to be repeated for each additional sending facility that requires acknowledgements. The path will stay the same but the facility name will change. |
Checking imported results in Best Practice
| Warning |
|---|
| Please Note: The Best Practice application BP Link must be running for Best Practice to be able to import results if you require any assistance locating or starting the BP Link application please call the Best Practice Helpdesk on (07) 4155 8800 . |
Open Best Practice Software.
- Depending on the Build No determined in Step 2. please select the instructions that best correspond to your version of Best Practice.
Setup for Best Practice 1.11.1.934 and above
Setup for Best Practice 1.11.0.924 and below
| Table of Contents | ||||||
|---|---|---|---|---|---|---|
|