Overview
This article will cover the basic functionality of Medical-Objects Explorer Online. If you have any questions or require any further information, please contact the Helpdesk on (07) 5456 6000.
Medical-Objects Explorer Online is a web-based application solution that allows you to send and receive patient documents from your own personal web browser on a tablet, desktop or laptop device.
| Multiexcerpt | ||
|---|---|---|
| ||
RequirementsExplorer Online was designed to run on desktops, laptops and modern tablets running Windows, MacOS or Linux. Mobile phones are not currently supported. Please take note of the browser requirements below. Supported Browsers
|
| Children Display | ||
|---|---|---|
|
PROMs User Guide
| Multiexcerpt | |||||
|---|---|---|---|---|---|
| |||||
Logging in and outWhen first loading Explorer Online you will be presented with a login screen. Simply enter in your username and password and click login to proceed.
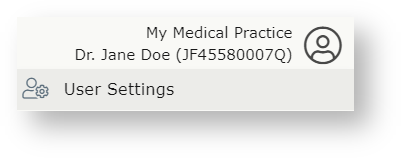
Once logged in you can log out Logout again or Change Provider by simply clicking on the User Menu in the top right hand corner of the screen.
| |||||
| MultiExcerptName
| Dashboard Layout | |||
Dashboard LayoutThe Dashboard is the default page that will appear once you have logged into Explorer Online. The Dashboard is split into three sections: navigation menu, sidebar and the main content area.
|


| Multiexcerpt | ||
|---|---|---|
| ||
Navigation MenuThis is the main navigation menu. The menu is dynamically built up based on what features your server has enabled and what permissions your user account has. If a menu item is missing you may need to call the Helpdesk to correct your user permissions or enable a server feature. User MenuThe User Menu is the menu in the top right hand corner. This will display the server you've logged into and also which provider you selected at login. When you click on the menu a drop down will appear with menu options related to your user account.
|
| MultiExcerptName | Dashboard Layout Sidebar |
|---|
Sidebar
The Sidebar is a feature that allows you to access and manage your patient documents. The Sidebar is split into two sections: Patients and Documents.
If you're using Explorer Online on a smaller screen you have the option to collapse the sidebar by clicking the collapse icon ![]() found on the left side of the Patients header. You can then expand the Sidebar again by clicking the
found on the left side of the Patients header. You can then expand the Sidebar again by clicking the ![]() icon.
icon.
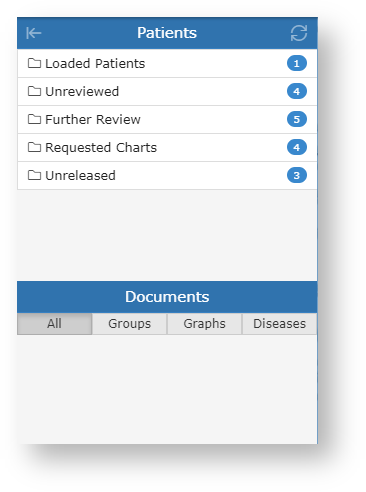
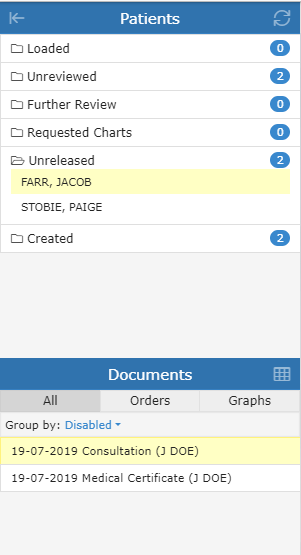
Patients
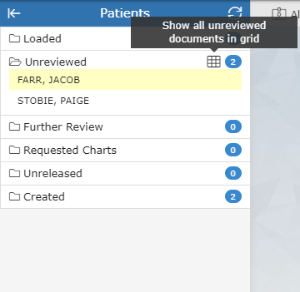
The Patients section of the Sidebar consists of individual folders which contains patient documents. The folders will list each unique patient that has a document for that folder. The count to the right is the amount of patients in the folder and not the amount of combined documents.
Hovering over a folder will reveal a grid icon (![]() ). This button will load all the documents in that folder into a grid. From there you can then perform bulk actions on the documents such as printing or forwarding to another provider.
). This button will load all the documents in that folder into a grid. From there you can then perform bulk actions on the documents such as printing or forwarding to another provider.
To refresh the contents of the folders simply click the refresh button (![]() ) in the title bar.
) in the title bar.
Contains any patients you've done a lookup on or retrieved all documents for.
You can remove a patient from this list by clicking the remove icon (![]() ).
).
If you want to clear the folder and remove all patients you can click on the clear icon (![]() ).
).
Contains patient documents that have been parked. A document can be parked by clicking the 'Park' document action button.
![]()
Documents in this folder can only be accessed by the provider who made the original 'Park' request.
To remove a document from this folder click the 'Unpark' document action button.
Contains patient documents with the requested chart status. A document can be moved to the Requested Charts folder by clicking the 'Request Chart' document action button.
![]()
Any user in your practice’s Explorer Online software, who has the granted permissions to view results, can access documents in this folder. For more information on setting user permissions, see our Explorer Online Admin Guide or please contact the Helpdesk on (07) 5456 6000.
Practices can decide how to use this feature in their own workflows. For example, doctors can use this option as a request for staff to gather medical charts after receiving a message on a patient. Another example might be when a doctor receives an eReferral, and then clicks 'Request Chart' so that staff can be ready with the referral on hand prior to a consultation with a patient. Upon completion of the workflow relating to the document, staff can then select the 'Cancel Chart' document action button to remove it from the Requested Charts folder.
![]()
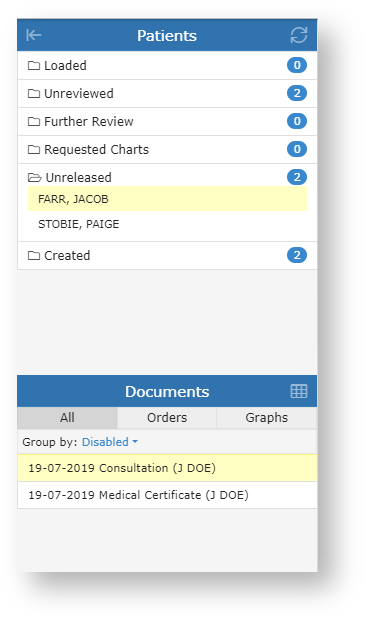
Contains patient documents that have not yet been released. Documents in this folder can either be released or deleted.
![]()
An unreleased document will have the following red text in the document title to indicate that it has not yet been released.
![]()
Unreleased documents are created by ticking the 'For Approval Before Delivered' option when sending a document.
Contains a recent list of documents that you have created, This includes both progress notes and documents that you have sent.
You can clear this folder by hovering over it and clicking on the Clear Folder button (![]() ).
).
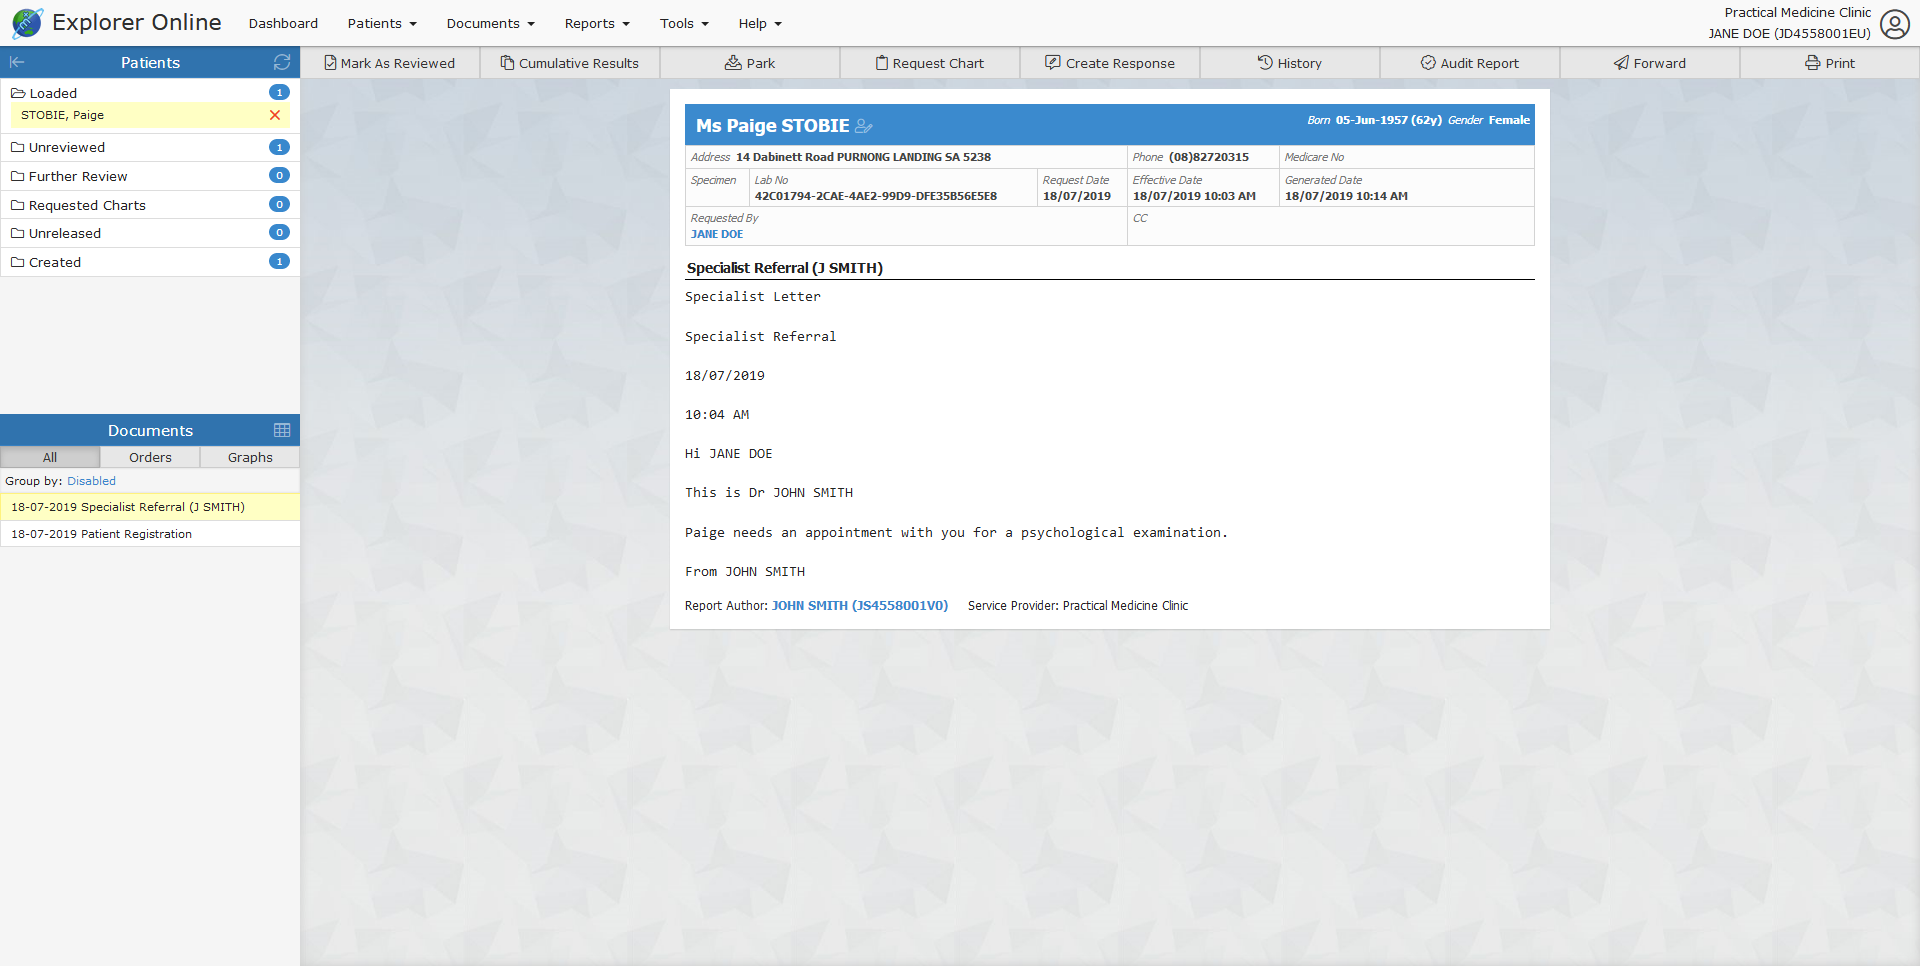
Documents
The Documents section will list all the documents for the selected patient that correspond to the folder the patient is in. For example if you select a patient in the Unreviewed folder, all unreviewed documents for that patient will be listed.
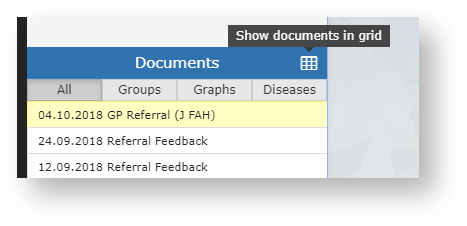
Hovering over the Documents section will reveal a grid icon (![]() ). This button will load all the documents listed into a grid. From there you can then perform bulk actions on the documents such as printing or forwarding to another provider.
). This button will load all the documents listed into a grid. From there you can then perform bulk actions on the documents such as printing or forwarding to another provider.
Abnormal results will show as red in the documents list.
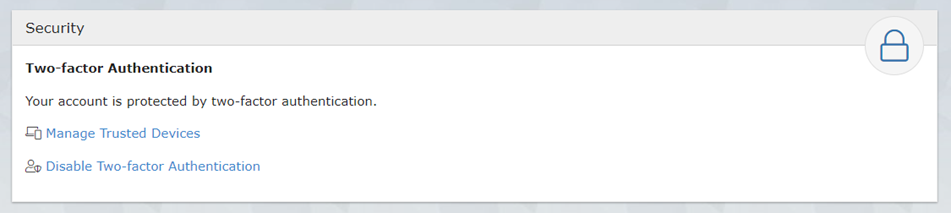
Setting up Two-Factor AuthenticationTwo-factor authentication is a security feature that helps protect your account in addition to your password. With two-factor authentication, a special login code together with your username and password will need to be entered each time someone tries to access your account from a computer or device that isn't recognised. In order to generate the special login codes, you will need to install a free app which supports the Time-based One-time Password Algorithm (TOTP) such as Google Authenticator, Authy and Microsoft Authenticator. There are many others, and some of these apps also support generating codes from desktop computers. To enable two-factor authentication can be enabled through the following steps. 1. Once you have logged in, Two-Factor Authentication can be enabled by clicking 'Enable Two-factor Authentication' on the 'Security' section in the Dashboard.
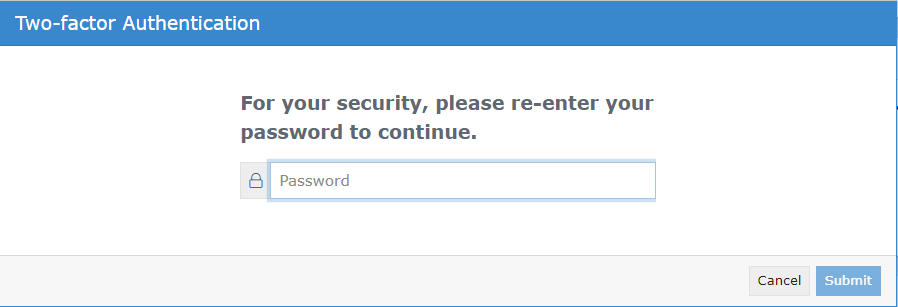
2. It will prompt you for your password
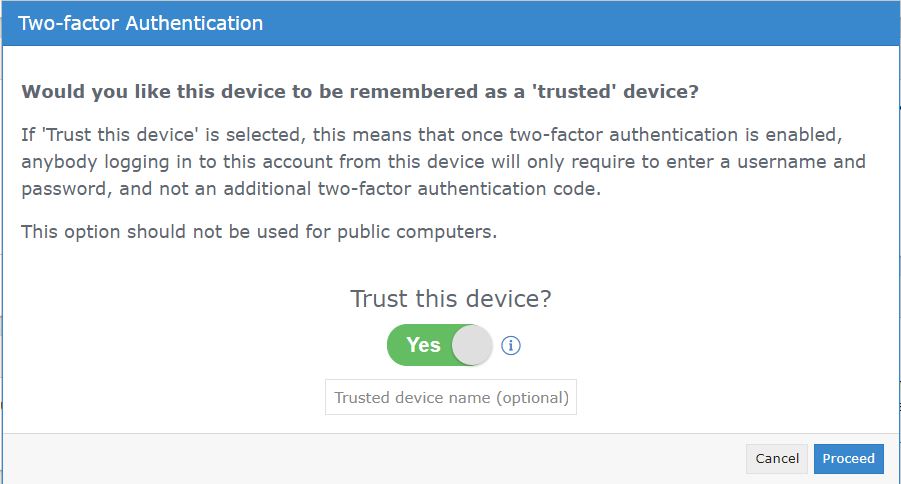
3. Decide whether you would like to set your device as a trusted device (this will allow you to skip these Two-Factor steps for 30 days on the selected device). Simply use the toggle button below “Trust this device” to select your choice, then select “Proceed”.
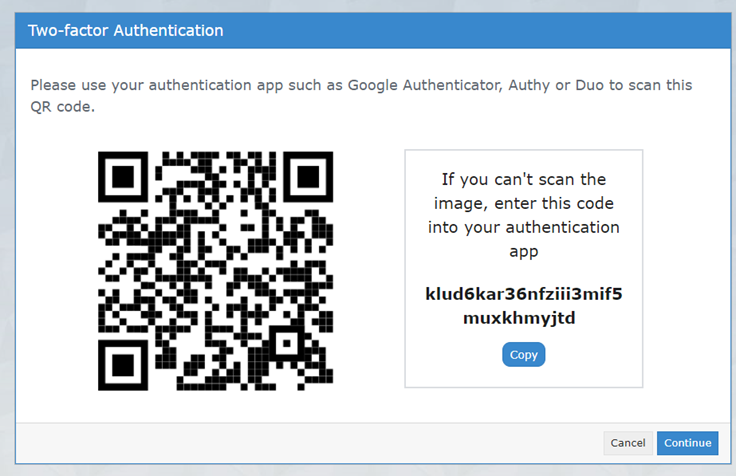
4. Open your Two-Factor Authentication app and scan the QR code provided (or enter the optional code), then click “Continue”.
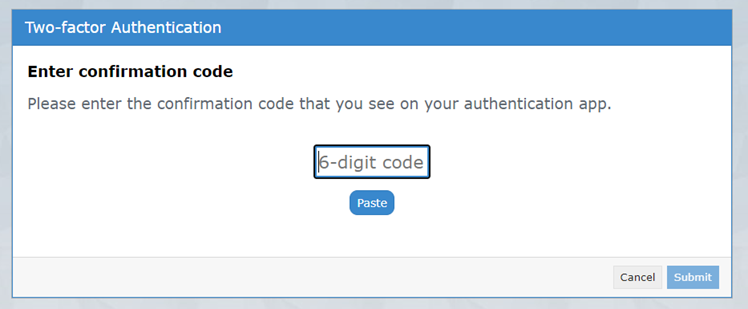
5. Enter the code your app provided you, then select “Submit”.
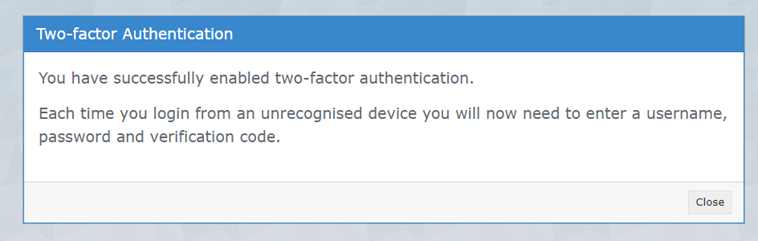
6. Your Two-Factor Authentication is now setup – Click “Close”.
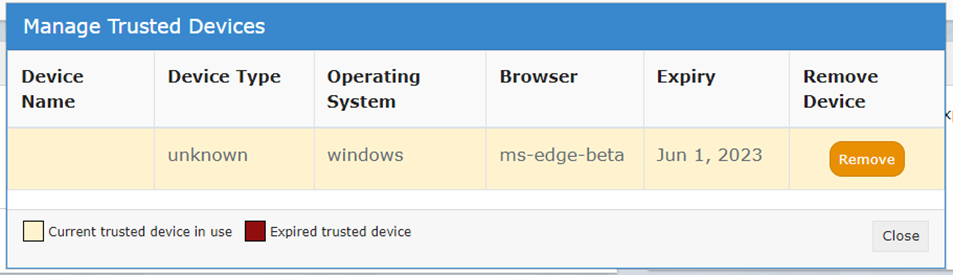
Managing Trusted Devices1. Locate the “Security” section on your Medical Objects dashboard, and select “Manage Trusted Devices”.
2. A list of trusted devices should display. Simply click “Remove” to delete a trusted device.
Please note: Trusted devices will allow you to skip the Two-Factor steps for 30 days - once the 30 days expires they will show as a “Expired Trusted Device”. This means the next time you log into the portal on this device you will be prompted to enter the code you receive from your Two-Factor Authentication app. 2FA F.A.QWhat is two-factor authentication? Two-factor authentication is a security feature that helps protect your account in addition to your password. With two-factor authentication, a special login code together with your username and password will need to be entered each time someone tries to access your account from a computer or device we don't recognise. What do I need to be able to use it? In order to generate the special login codes, you will need to install an app which supports the Time-based One-time Password Algorithm (TOTP) such as Google Authenticator, Authy, Microsoft Authenticator or Duo. There are many others, and some of these apps also support generating codes from desktop computers. Do I always need to enter a code when logging in? During login, you can choose not to use two-factor authentication again on that specific device by setting it as a ‘trusted device’. If you select this option, that device will only ask for your username and password when logging in for the next 30 days. You will still be protected, because when you or anyone else tries to sign in to your account from an unrecognised device, two-factor authentication will be required. Browser third party cookies need to be enabled for Explorer Online and two-factor authentication to operate correctly. They are usually enabled by default. You should not choose to trust a public device. How do I enable two-factor authentication? To enable two-factor authentication, you will need to use your app to scan a QR code generated by Explorer Online (or type in the code if you cannot scan it). Your app will then generate a confirmation code which you need to enter when prompted by Explorer Online. Your account will now be two-factor authentication enabled, and you will need to generate a code with your app whenever prompted by Explorer Online during login. Can this be made mandatory for everyone at the organisation? Two-factor authentication can be made mandatory for all users. This will force each account on login to enable two-factor authentication (if it is not already enabled). Please contact our helpdesk (helpdesk@medicalobjects.com) if you would like this enabled. How to reset two-factor authentication? If you have lost your device or app which was used to enable two-factor authentication, email helpdesk@medicalobjects.com for assistance. |

| Multiexcerpt | ||
|---|---|---|
| ||
Dashboard LayoutThe Dashboard is the default page that will appear once you have logged into Explorer Online. The Dashboard is split into three sections: Navigation Menu, Sidebar and the main content area.
|
| Multiexcerpt | |||||
|---|---|---|---|---|---|
| |||||
Navigation Menu
This is the main navigation menu. The menu is dynamically built up based on what features your server has enabled and what permissions your user account has. If a menu item is missing you may need to call the Helpdesk to correct your user permissions or enable a server feature. User MenuThe User Menu is the menu in the top right hand corner. This will display the server you've logged into and also which provider you selected at login. When you click on the User Menu a drop down will appear with menu options related to your user account.
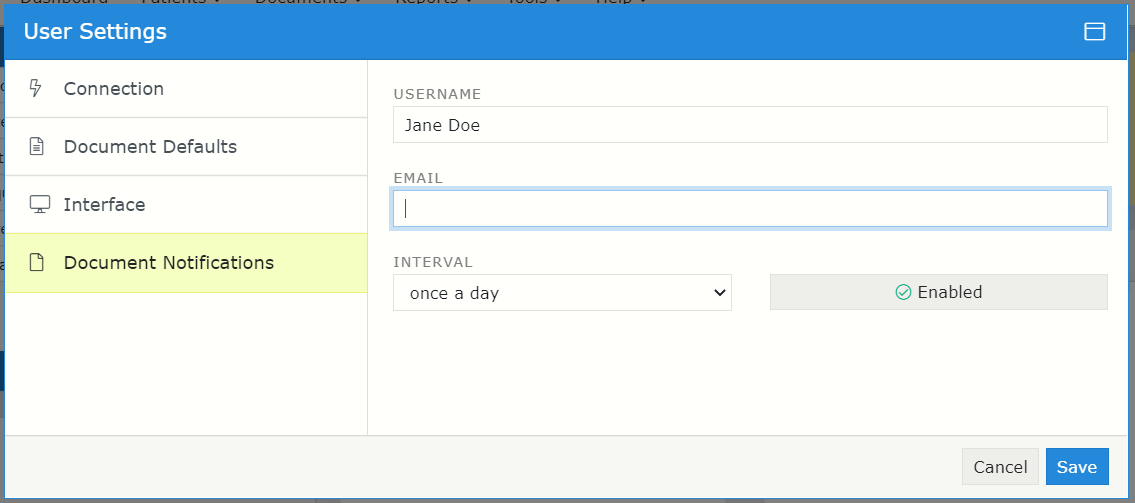
Email Notifications
|

| Multiexcerpt | ||||||||||||
|---|---|---|---|---|---|---|---|---|---|---|---|---|
| ||||||||||||
SidebarThe Sidebar is a feature that allows you to access and manage your patient documents. The Sidebar is split into two sections: Patients and Documents. If you're using Explorer Online on a smaller screen you have the option to collapse the sidebar by clicking the collapse icon
PatientsThe Patients section of the Sidebar consists of individual folders which contains patient documents. The folders will list each unique patient that has a document for that folder. The count to the right is the amount of patients in the folder and not the amount of combined documents. Hovering over a folder will reveal a grid icon ( To refresh the contents of the folders simply click the refresh button (
DocumentsThe Documents section will list all the documents for the selected patient that correspond to the folder the patient is in. For example if you select a patient in the Unreviewed folder, all unreviewed documents for that patient will be listed. Hovering over the Documents section will reveal a grid icon ( Abnormal results will show as red in the documents list. |
Managing Patients
Registering a Patient
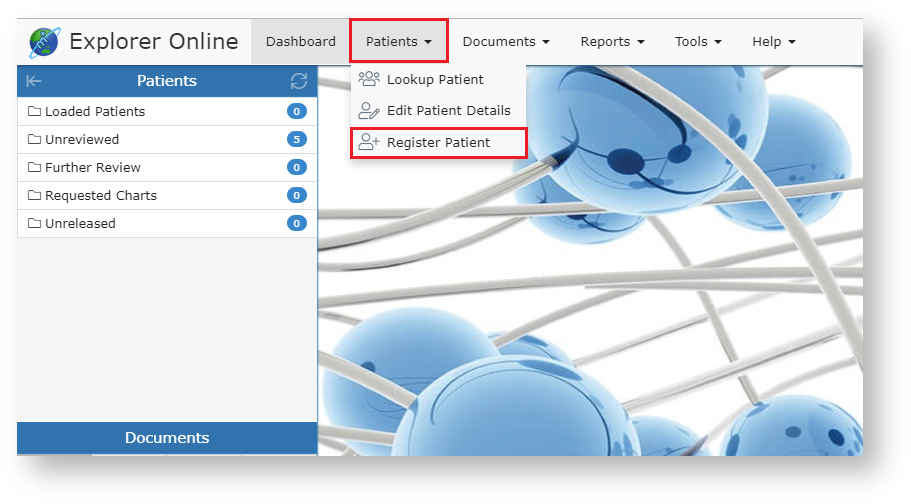
To register a patient, select the Patients button in the top navigation and then click Register Patient on the dropdown.
Once clicked, a window will pop up with text fields to input patient information, as seen in the screenshot below.
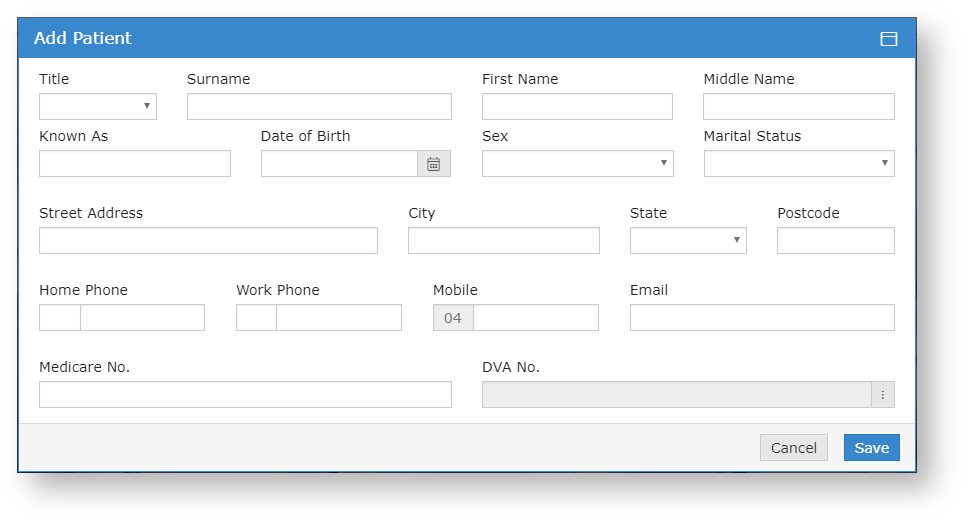
The required fields for registering a patient are Surname, First Name, and Date of Birth. While they are the only required fields, it's suggested that you fill as many of them out as possible, so you have as much information on documents as possible.
Editing a Patient
To edit a patient, go to the Patients dropdown in the top navigation bar, and then click Edit Patient Details.
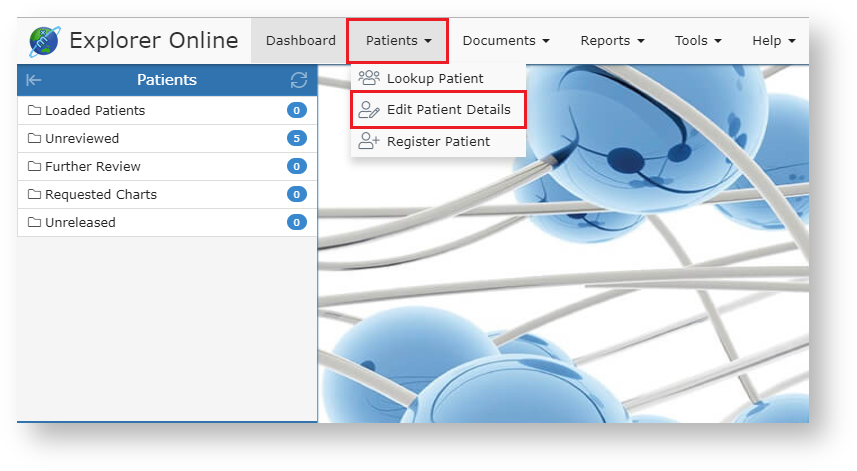
This will take you to the Patient Lookup window. The patient lookup window is used to search for current patients that your practice has previously created with Medical-Objects. You have three different options in which to search for, their name, ID or lab number. You can change these on the dropdown to the right of the search field. You can then type a search term into the text field, press the Search button and if all is well, you will see your patient.
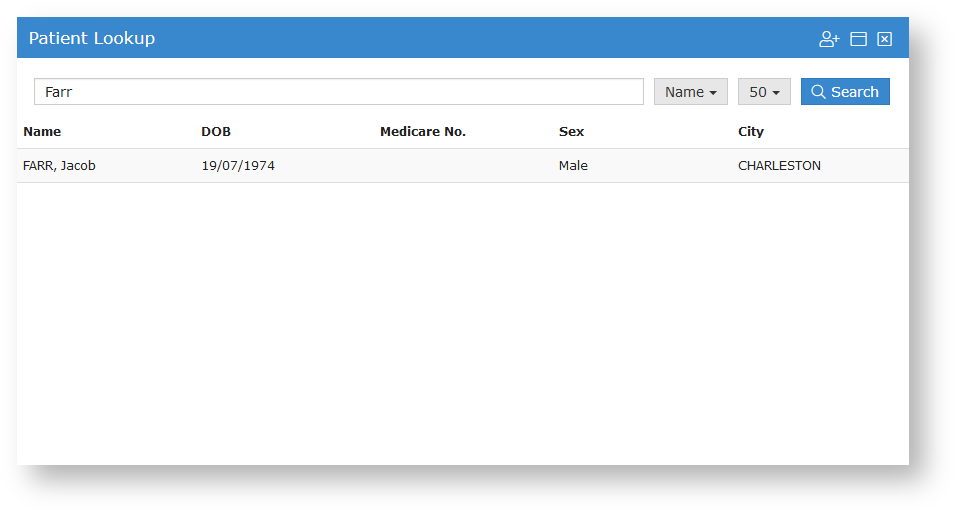
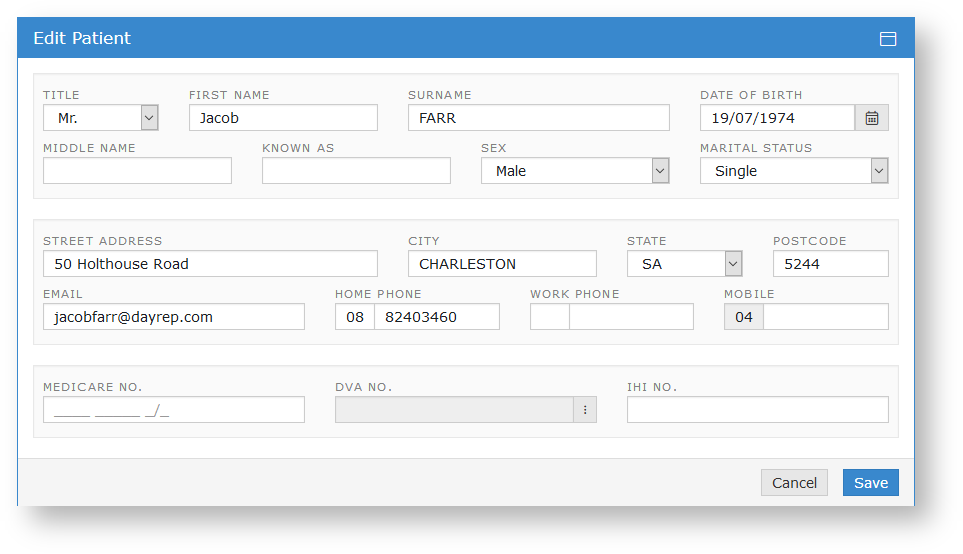
Once you have found your patient, you can then select the patient you wish to view, and then you will see the edit screen. Fill out the fields that you wish to change or add, and then click the Save button.
| Multiexcerpt | ||||||||||||||||||||||||||||||||||
|---|---|---|---|---|---|---|---|---|---|---|---|---|---|---|---|---|---|---|---|---|---|---|---|---|---|---|---|---|---|---|---|---|---|---|
| ||||||||||||||||||||||||||||||||||
Viewing Documents
Document Actions
Viewing documents in gridTo list documents in a grid allowing for bulk actions you can simply click on the grid icon (
|
Sending a Document
Provider Lookup
The Provider Lookup feature allows you to easily search details and check if a provider is routable (setup to receive sent results) before you send a document.
| Multiexcerpt include | ||||
|---|---|---|---|---|
|
| Multiexcerpt include | ||||
|---|---|---|---|---|
|
You can also complete the Provider Lookup when completing the Addressing Details when sending a document (see below).
Sending a Text Document
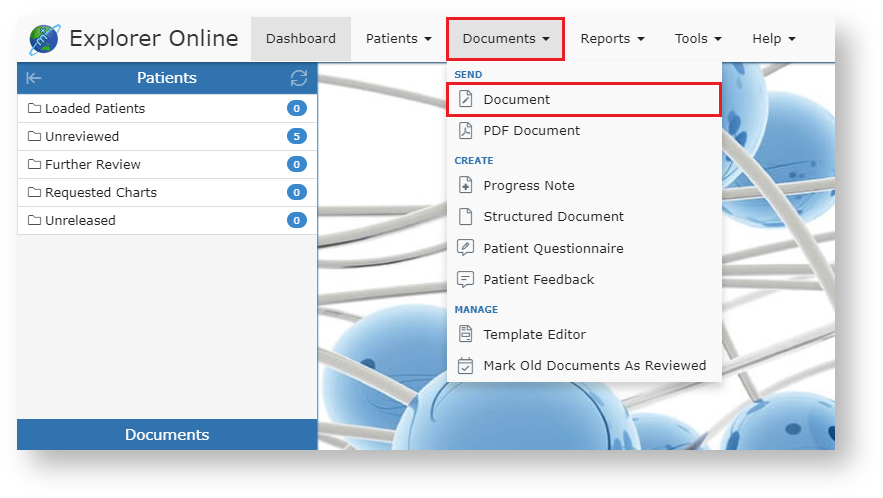
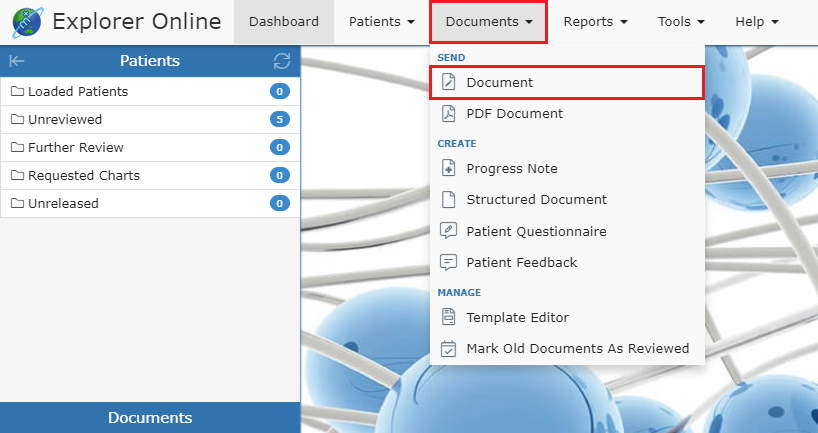
To send a document, you can click the Documents → Document (Under Send) in the navigation bar at the top.
Most of filling out the document information is done automatically. If you have a patient selected in the Patients Sidebar then the Patient Details will already be filled out. If not, then you can click the Find button in the Patient Details section and find the patient details you need. You can also Add a patient on this screen, if the patient whose document you want to send isn't in the system yet.
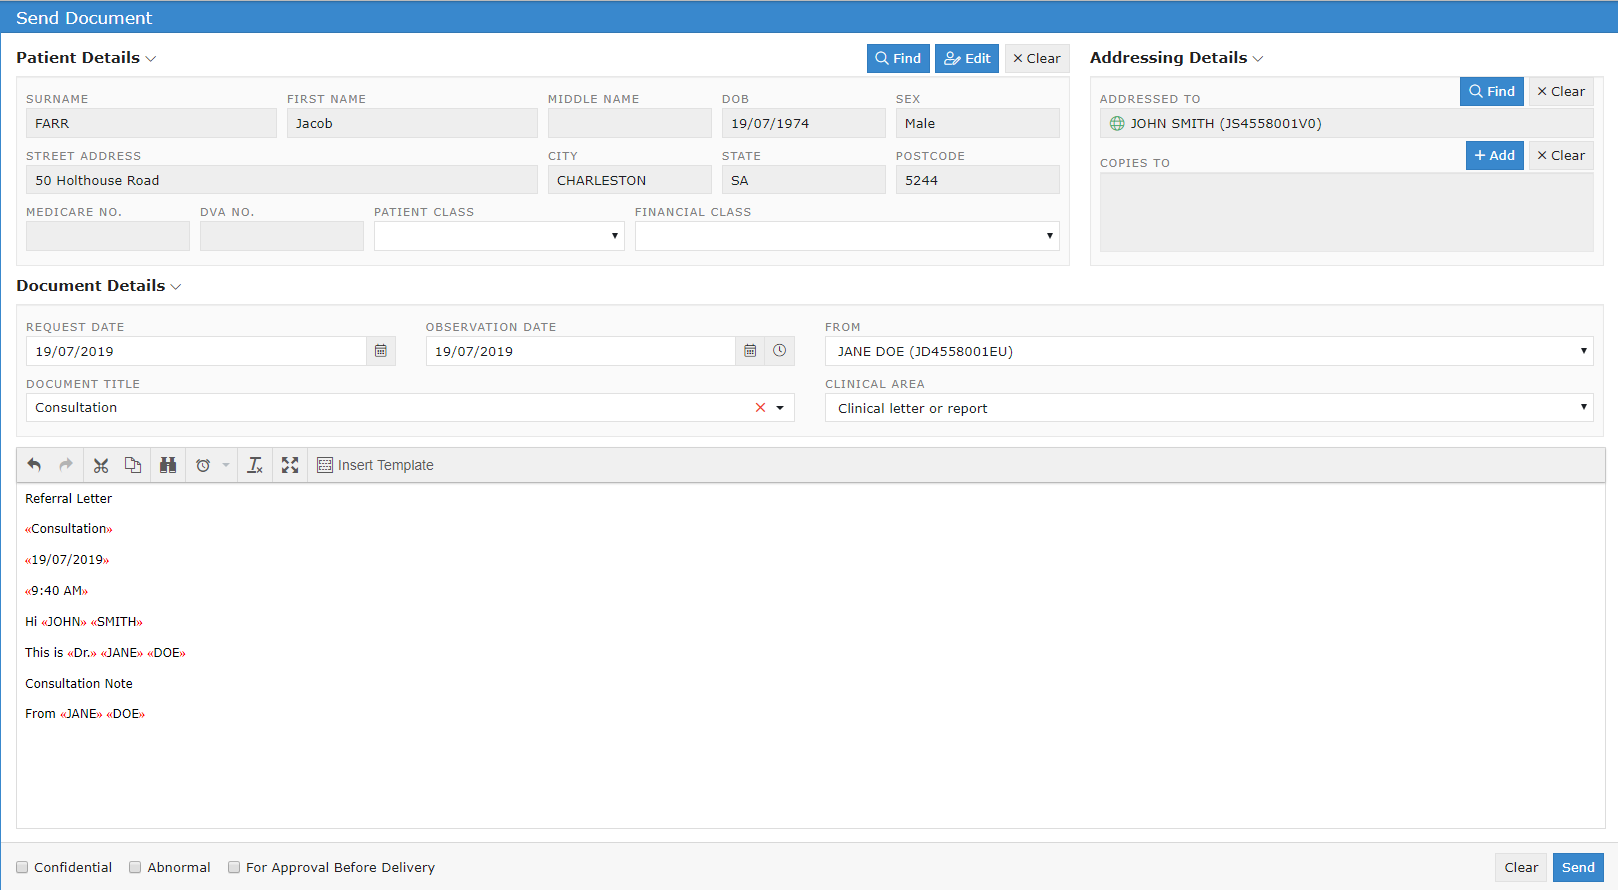
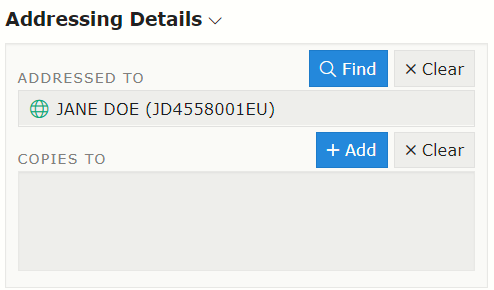
Addressing Details
To add a practitioner to send to, you can go across to the Addressing Details section. To add providers, click the Find and Add buttons, to either add the main provider, or to send copies to certain providers. This button will take you to the Provider Lookup window where you can find the providers you wish to send to.
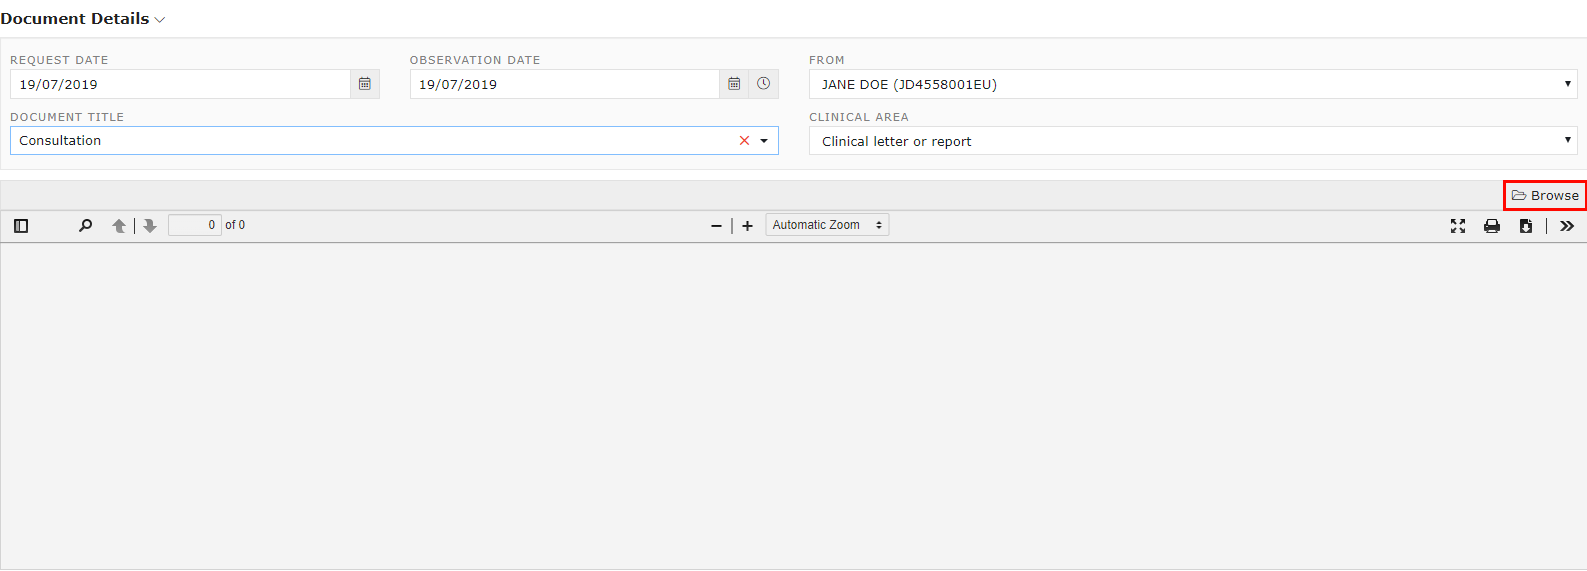
Document Details
You can then fill in the Document Details section with the specific details of your document. One of the special additions is the use of Templates, which you can click the Insert Template button to quickly add content to your document.
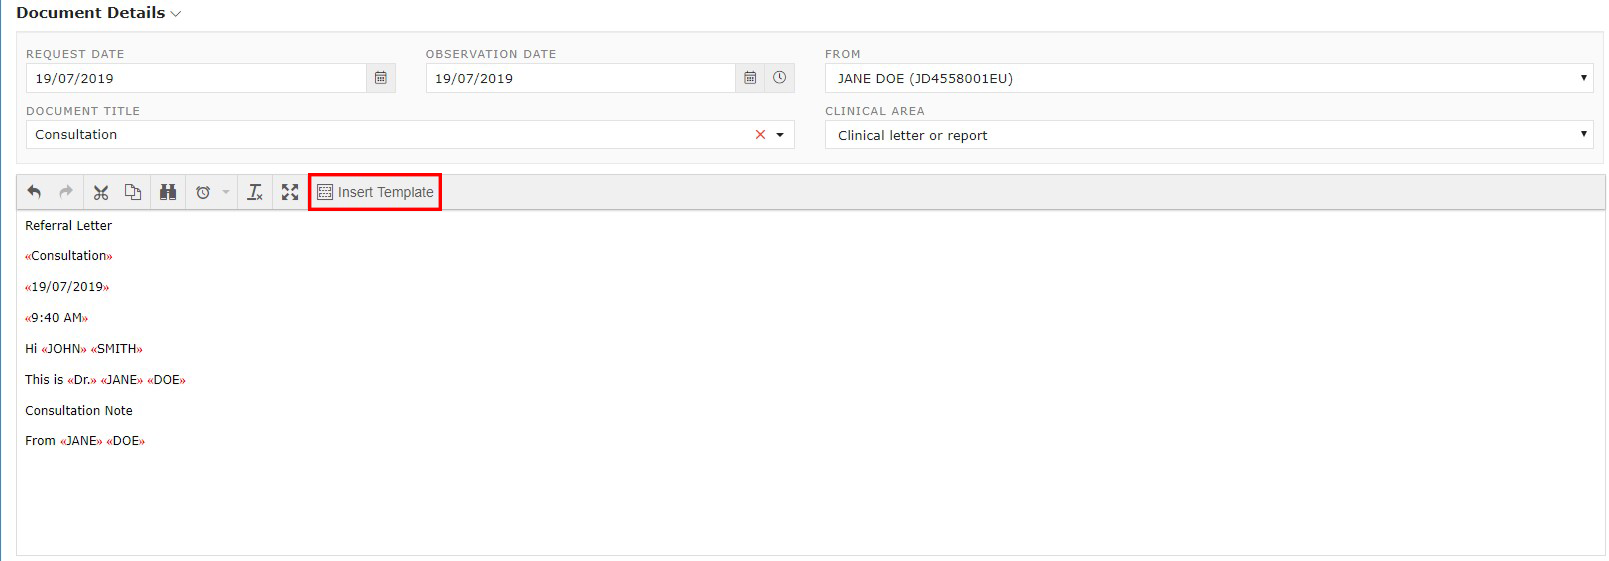
| Info | ||
|---|---|---|
| ||
|
Unreleased Documents
An unreleased document can be thought of as a draft before sending the document. You may want to keep it in your system, but not send it off to the Addressee. If this is the case, then you can click the For Approval Before Delivery button in the bottom right of the Send Document screen.
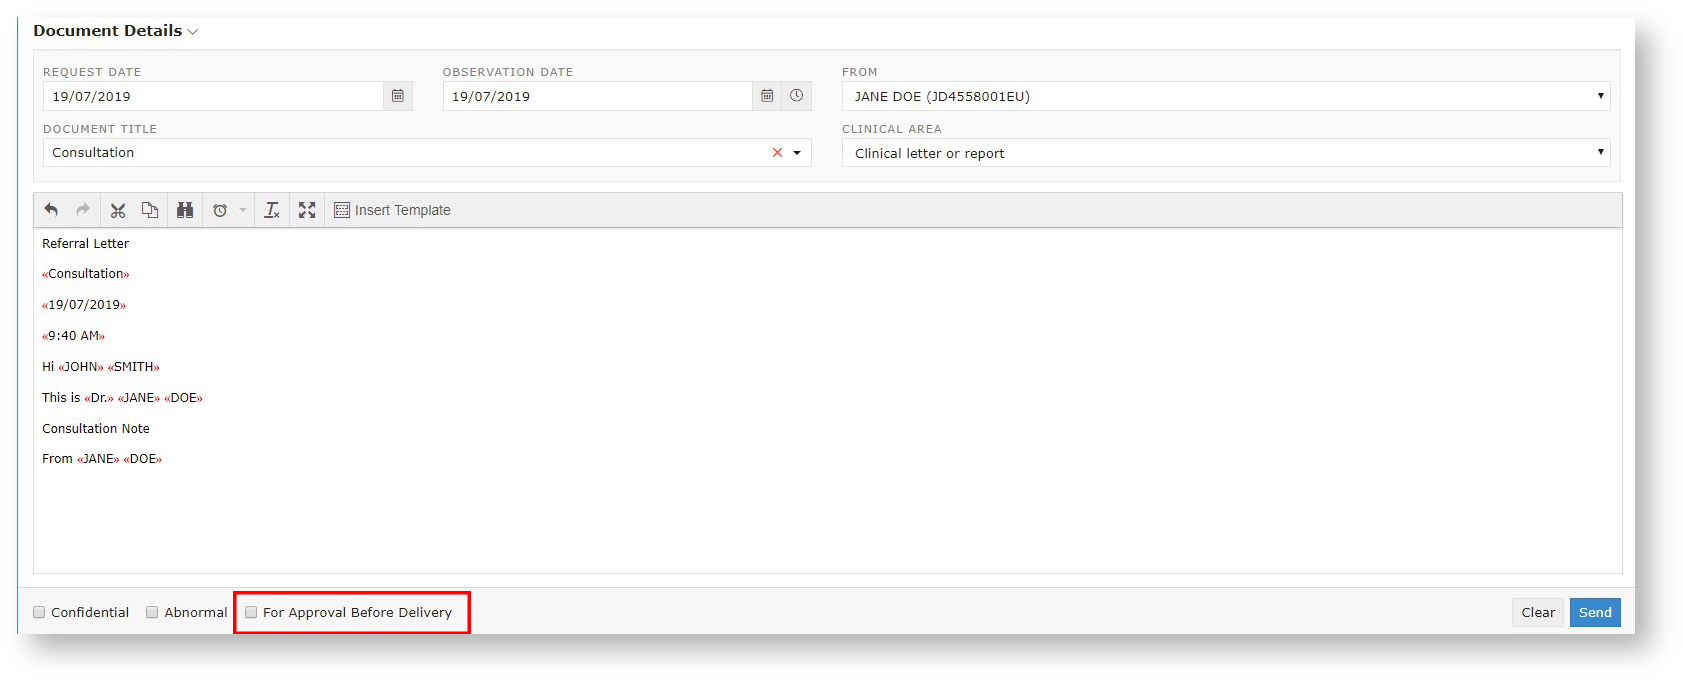
This will then save it into the Unreleased folder in the Patients section of the Sidebar.
Sending a PDF Document
Sending a PDF document is very similar to sending a plain document. The main difference is that you aren't sending text, you are sending an attached PDF file. All of the Addressing and Patient detail setting is the same, the main difference is in the Document Details, where you normally would type in the content, there is now a PDF Viewer.
To send a PDF document, you can click the Documents → PDF Document (Under Send) in the navigation bar at the top.
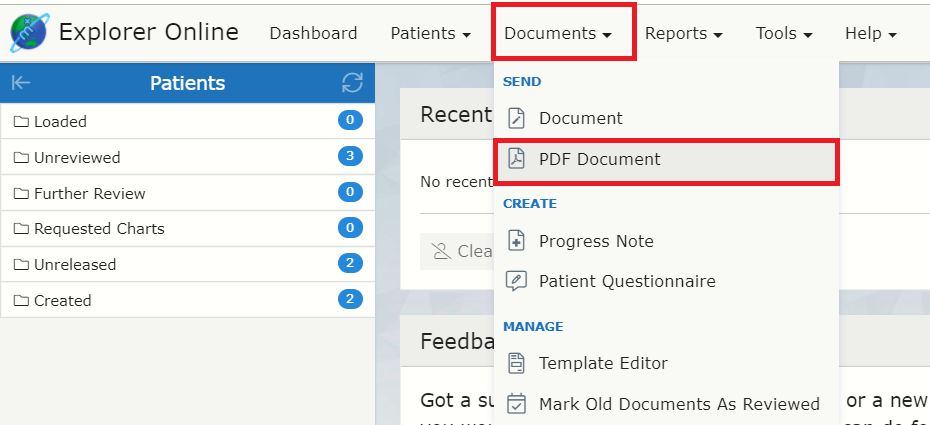
To open a PDF, click the Browse button:
| Info | ||
|---|---|---|
| ||
|
To send the PDF document, simply hit the Send button once all the information has been included,
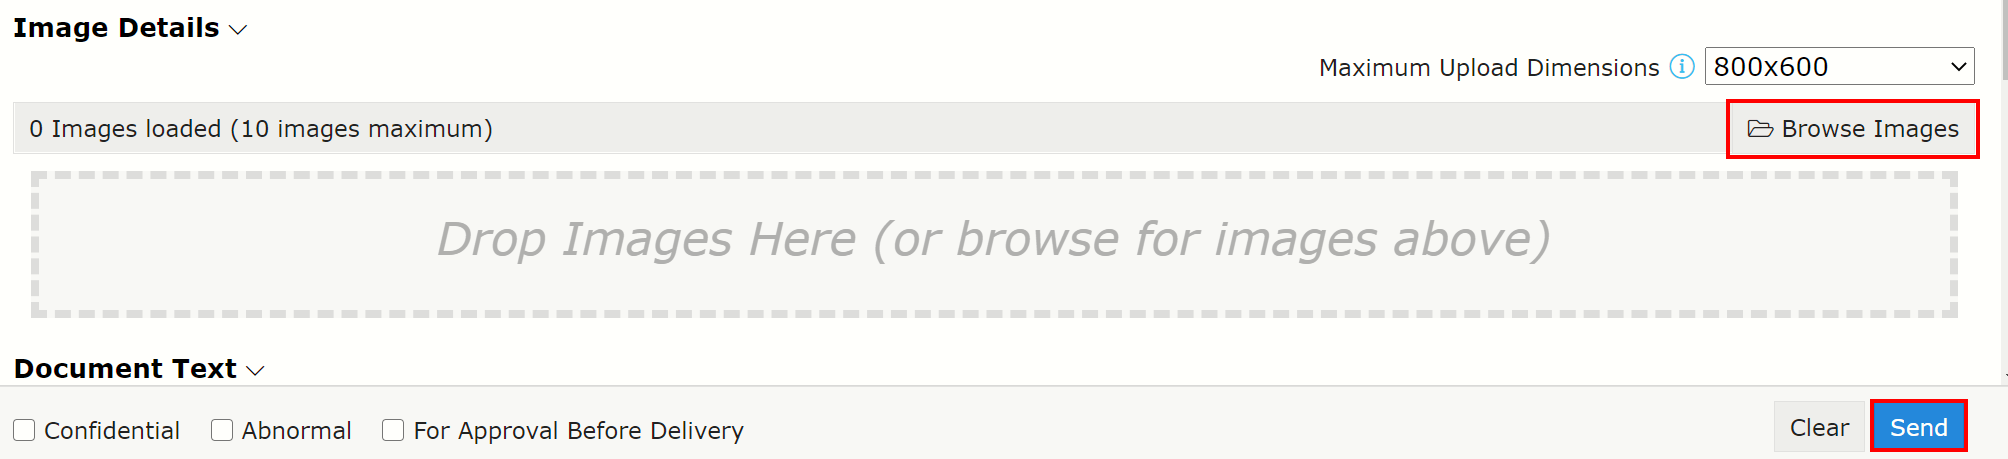
Sending a document with an image
To send images you can click the Documents → Images (Under Send) in the navigation bar at the top.
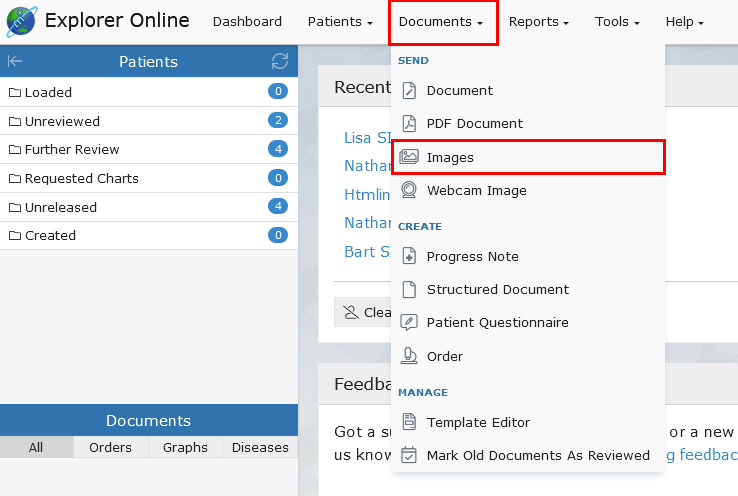
To add the images you would like to send, click the Browse Images button (below). To send the images, hit the Send button once all the information has been included.
Sending a Word/RTF Document
Currently it's only possible to send a plain text document OR a PDF document. If you wish to send a Microsoft Word document or any other format you have the option to save the document as a PDF (for example from Microsoft Word) and then send it as a PDF.
We're currently looking into adding the ability for sending other document types.
Creating a Progress Note
A Progress Note is an internal document for a patient that is stored against the patient's file. You can create a Progress Note for a patient from the Documents menu in the top navigation.
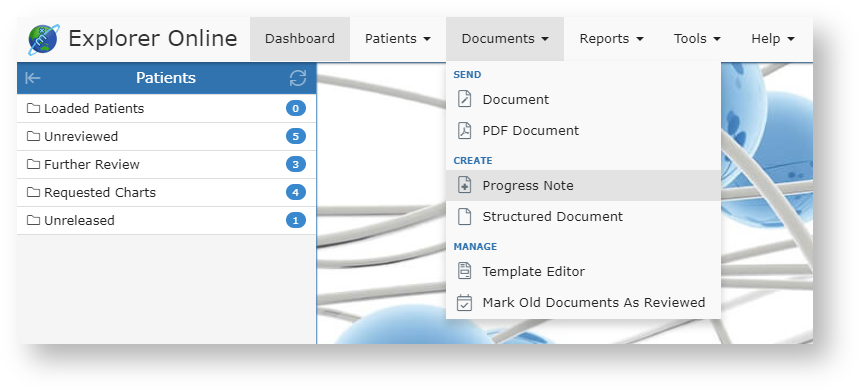
If you don't already have an active patient, you will be prompted to find a patient. Once a patient is selected you will be prompted with the Progress Note window.
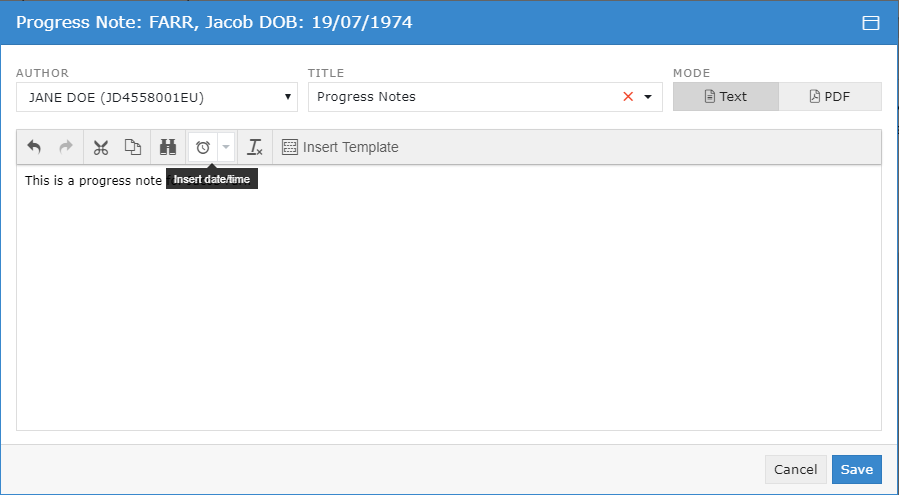
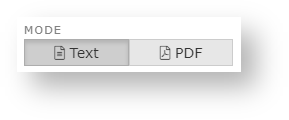
A Progress Note can contain plain text or a PDF document, but not both. Select which document content you'd like to add via the Text or PDF mode buttons in the top right hand corner.
| Info | ||
|---|---|---|
| ||
|
Document Template Editor
To get to the Document Template Editor, you can click Documents → Template Editor (Under manage). A screen should show up with text editors, and a sidebar.
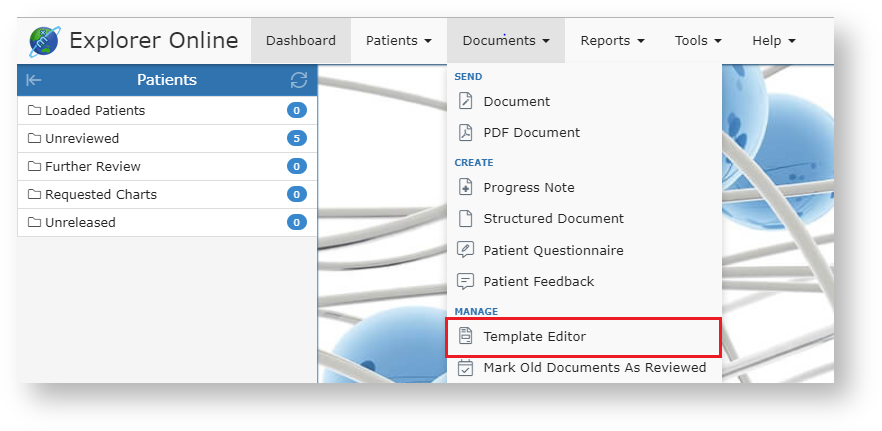
After clicking that button, it should take you to the screen below.
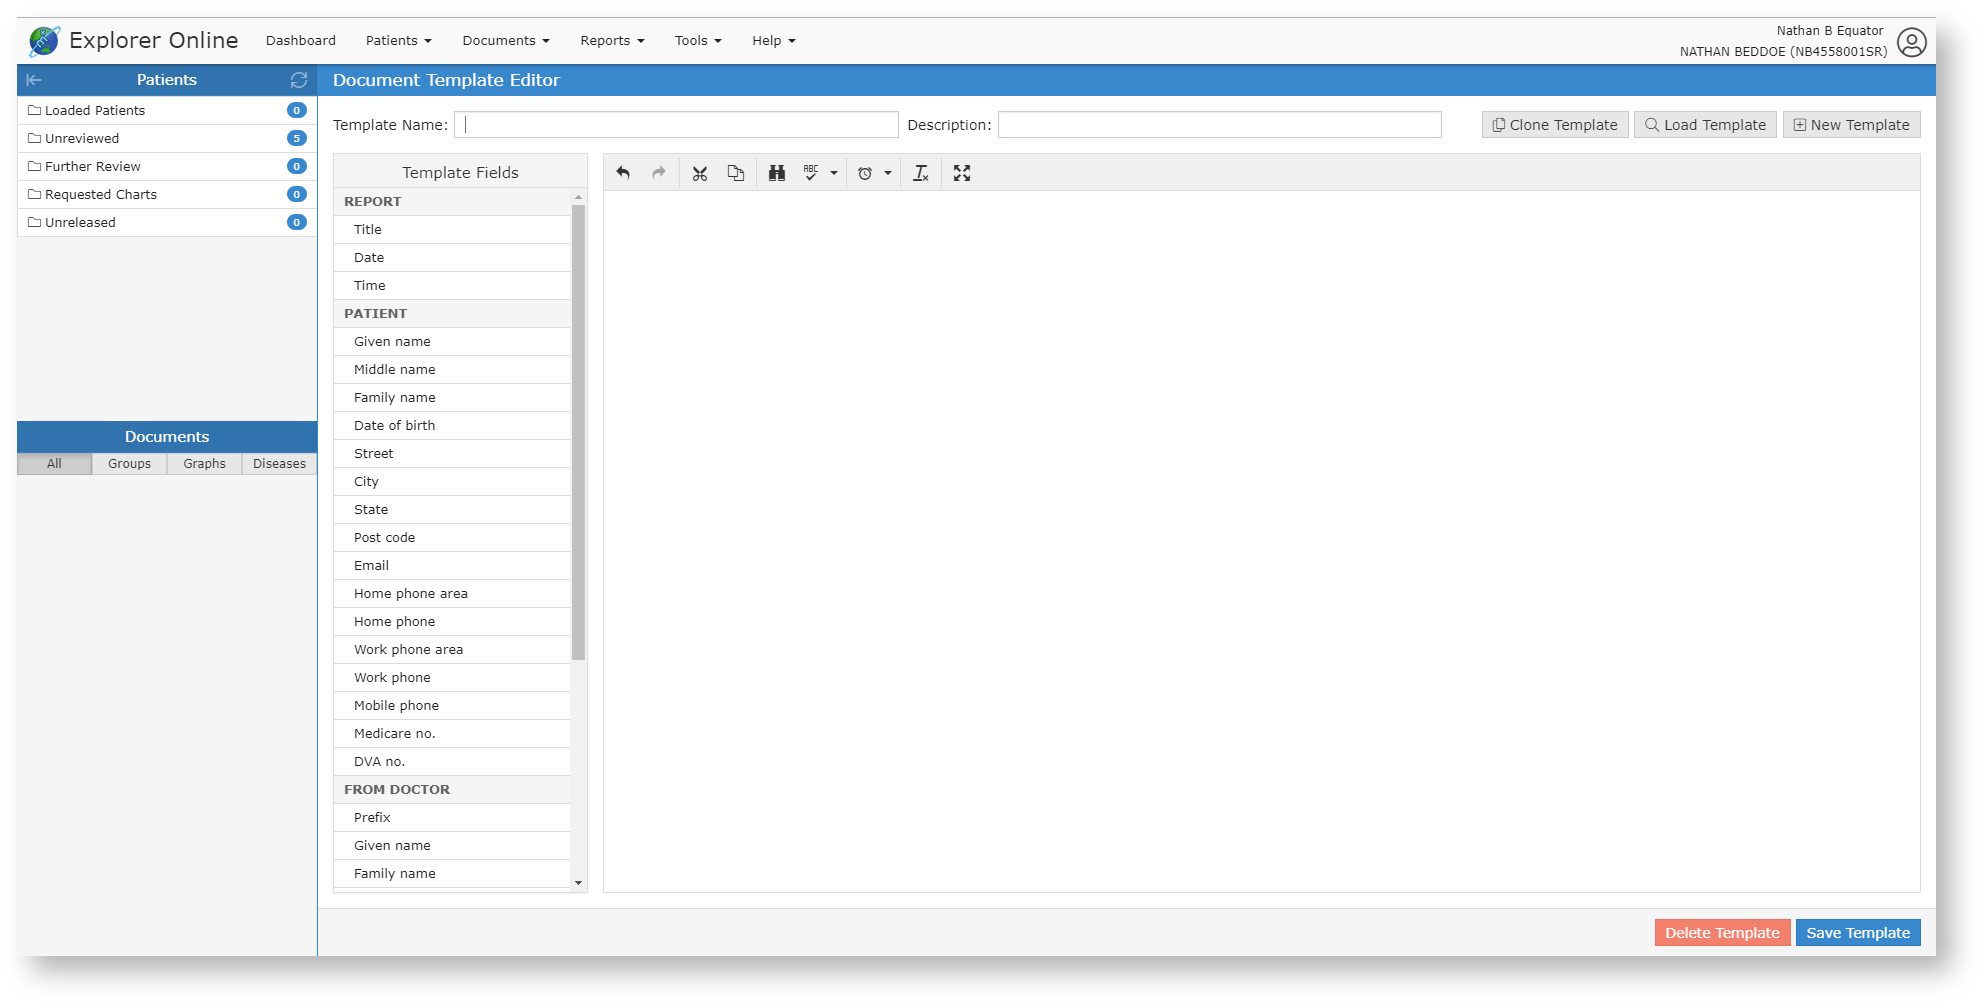
Creating a Template
A document template must have a template name, description and some content.
Template Name
The template name is what you'll see on your end to identify each template. You should call it something descriptive, but also keep it concise.
Description
The description will show as a subheader when selecting the template. This is generally longer than the Template name and can help when you have a few very similar template names.
Content
The content is what will automatically be generated into the document when you select a template. You can see on the left of the template editor a "Template Fields", these are special fields, that when you import the template into your document, they will fill out with the details you've included. So if you have selected a patient named "John Doe", then the Given Name template field will be "John" and the Family Name field will be "Doe". You can also write plain text with no template fields if that is what you want.
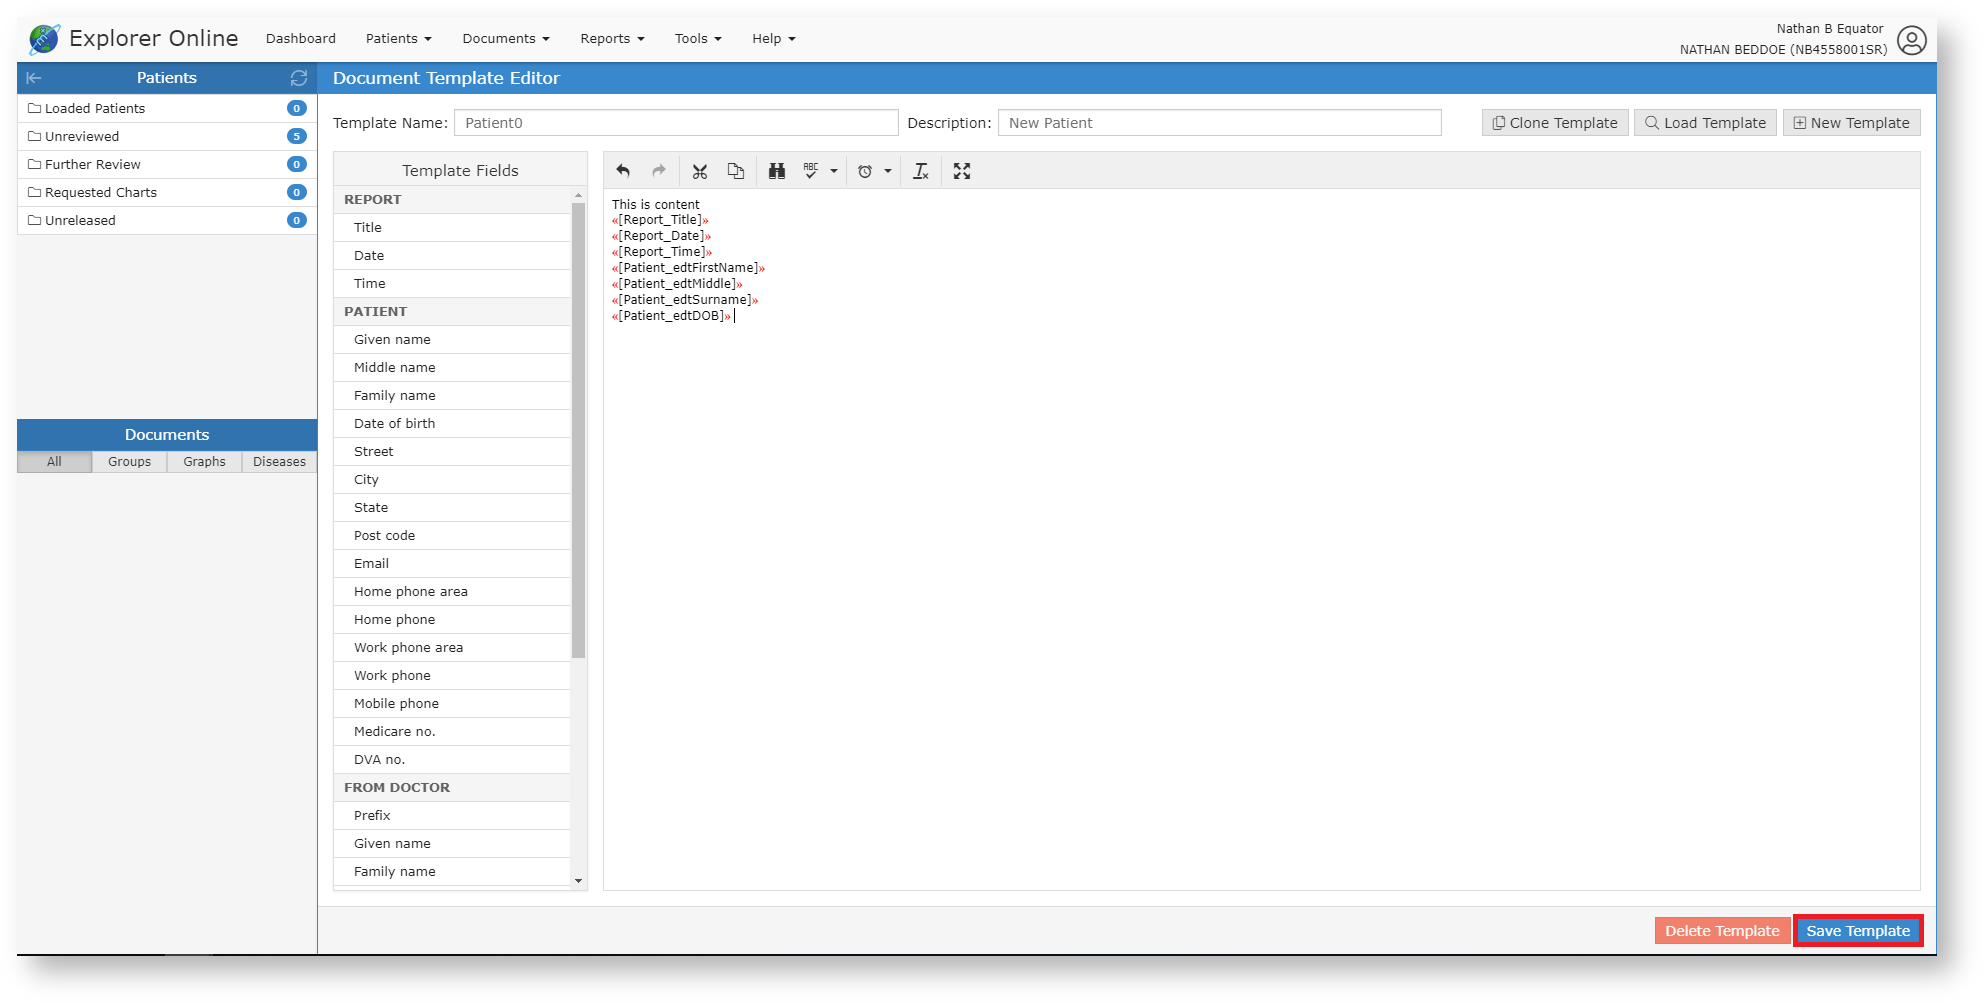
Submitting a Template
Once you have filled out the required fields, you can create the template by clicking the "Save Template" button, highlighted in the below screenshot.
Editing an existing Template
To edit an existing template you need to:
Load a template
Select a template from the proceeding screen by clicking on the desired template, and clicking Load in the bottom right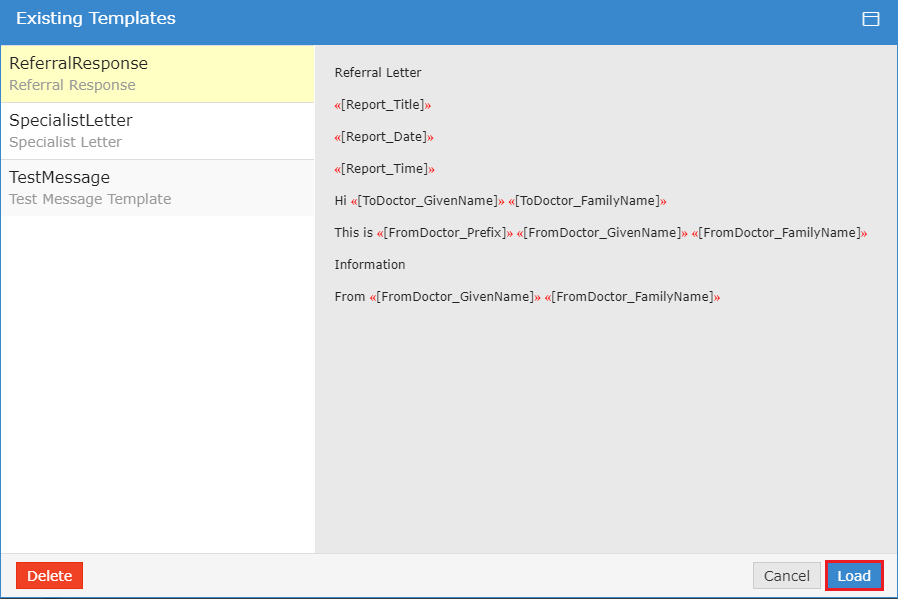
Make any changes that you wish to make, and then click the Save Template button in the bottom right, exactly how you would save a new template.
Deleting a Template
Click the Load Template button.

Then, select the template you wish to delete, and then click the Delete button in the right hand corner of the new screen.

| Multiexcerpt | |||||
|---|---|---|---|---|---|
| |||||
Activity ReportThe Activity Report allows you to view the transaction history of both incoming and outgoing documents. You can access the Activity Report via the Reports top menu option.
When selecting the Activity Report menu option you will be presented with a window listing the report filtering options available. These will help you narrow the report down to only the documents you're interested in. By default, the filter options will show the current daily activity. You can leave it at that or you can click on the drop down button next to the end date to select a pre-defined range.
|

Managing Patients
Registering a Patient
To register a patient, select the Patients button in the top navigation and then click Register Patient on the dropdown.
Once clicked, a window will pop up with text fields to input patient information, as seen in the screenshot below.
The required fields for registering a patient are Surname, First Name, and Date of Birth. While they are the only required fields, it's suggested that you fill as many of them out as possible, so you have as much information on documents as possible.
Editing a Patient
To edit a patient, go to the Patients dropdown in the top navigation bar, and then click Edit Patient Details.
This will take you to the Patient Lookup window. The patient lookup window is used to search for current patients that your practice has previously created with Medical-Objects. You have three different options in which to search for, their name, ID or lab number. You can change these on the dropdown to the right of the search field. You can then type a search term into the text field, press the Search button and if all is well, you will see your patient.

Once you have found your patient, you can then select the patient you wish to view, and then you will see the edit screen. Fill out the fields that you wish to change or add, and then click the Save button.

| MultiExcerptName | Viewing Documents |
|---|
Viewing Documents
Document Actions
Adds the document to the Requested Charts sidebar folder.
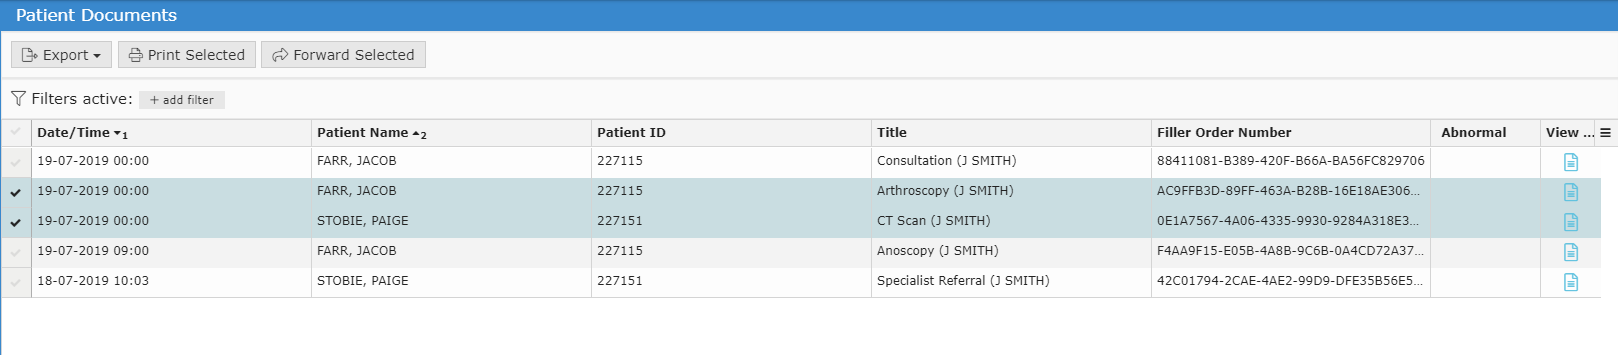
Viewing documents in grid
To list documents in a grid allowing for bulk actions you can simply click on the grid icon (![]() ) in the sidebar from either the documents section or when hovering over each folder.
) in the sidebar from either the documents section or when hovering over each folder.
Bulk Actions
You can select multiple documents in the grid and then perform an action on the selection. Currently the bulk actions available are:
- Printing
- Forwarding
- Exporting to CSV (this exports the transaction details and not the document itself, useful for auditing purposes)
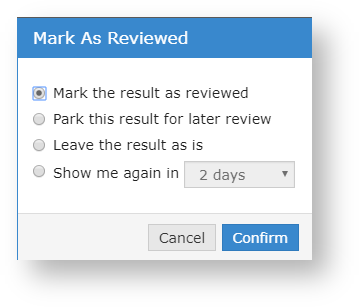
Marking documents as reviewed
Documents that appear in your Unreviewed sidebar folder will need reviewing so that the sender of the document receives an acknowledgement.
Marking a document as reviewed can be done one of two ways. Both methods will only be accessible if you're viewing the document from within the Unreviewed sidebar folder.
- Clicking on the Mark as reviewed document action button.
- Navigating to the next document in the Unreviewed folder. This will prompt you with a few options.
Sending a Document
To send a document, you can click the Documents → Document (Under Send) in the navigation bar at the top.
Sending a Text Document
Most of filling out the document information is done automatically. If you have a patient selected in the Patients Sidebar then the Patient Details will already be filled out. If not, then you can click the Find button in the Patient Details section and find the patient details you need. You can also Add a patient on this screen, if the patient whose document you want to send isn't in the system yet.
To add a practitioner to send to, you can go across to the Addressing Details section, where you'll find two text fields. To add providers to these fields, click the Find and Add buttons, to either add the main provider, or to send copies to certain providers. This button will take you to the Provider Lookup window where you can find the providers you wish to send to.
You can then fill in the Document Details section with the specific details of your document. One of the special additions is the use of Templates, which you can click the Insert Template button to quickly add content to your document.
Unreleased Documents
An unreleased document can be thought of as a draft before sending the document. You may want to keep it in your system, but not send it off to the Addressee. If this is the case, then you can click the For Approval Before Delivery button in the bottom right of the Send Document screen. This will then save it into the Unreleased folder in the Patients section of the Sidebar.
Sending a PDF Document
Sending a PDF document is very similar to sending a plain document. The main difference is that you aren't sending text, you are sending an attached PDF file. All of the Addressing and Patient detail setting is the same, the main difference is in the Document Details, where you normally would type in the content, there is now a PDF Viewer.
To send a PDF document, you can click the Documents → PDF Document (Under Send) in the navigation bar at the top.
To send the PDF document, simply hit the Send button once all the information has been included,
Sending a Word/RTF Document
Currently it's only possible to send a plain text document OR a PDF document. If you wish to send a Microsoft Word document or any other format you have the option to save the document as a PDF (for example from Microsoft Word) and then send it as a PDF.
We're currently looking into adding the ability for sending other document types.
Creating a Progress Note
A Progress Note is an internal document for a patient that is stored against the patient's file. You can create a Progress Note for a patient from the Documents menu in the top navigation.
If you don't already have an active patient, you will be prompted to find a patient. Once a patient is selected you will be prompted with the Progress Note window.
A Progress Note can contain plain text or a PDF document, but not both. Select which document content you'd like to add via the Text or PDF mode buttons in the top right hand corner.
To get to the Document Template Editor, you can click Documents → Template Editor (Under manage). A screen should show up with text editors, and a sidebar.
After clicking that button, it should take you to the screen below.
Creating a Template
A document template must have a template name, description and some content.
Template Name
The template name is what you'll see on your end to identify each template. You should call it something descriptive, but also keep it concise.
Description
The description will show as a subheader when selecting the template. This is generally longer than the Template name and can help when you have a few very similar template names.
Content
The content is what will automatically be generated into the document when you select a template. You can see on the left of the template editor a "Template Fields", these are special fields, that when you import the template into your document, they will fill out with the details you've included. So if you have selected a patient named "John Doe", then the Given Name template field will be "John" and the Family Name field will be "Doe". You can also write plain text with no template fields if that is what you want.
Submitting a Template
Once you have filled out the required fields, you can create the template by clicking the "Save Template" button, highlighted in the below screenshot.
Editing an existing Template
To edit an existing template you need to:
Load a templateSelect a template from the proceeding screen by clicking on the desired template, and clicking Load in the bottom right
Make any changes that you wish to make, and then click the Save Template button in the bottom right, exactly how you would save a new template.
Deleting a Template
Click the Load Template button.
Then, select the template you wish to delete, and then click the Delete button in the right hand corner of the new screen.
| Multiexcerpt | |||||||||||||||||||||||||
|---|---|---|---|---|---|---|---|---|---|---|---|---|---|---|---|---|---|---|---|---|---|---|---|---|---|
| |||||||||||||||||||||||||
Activity ReportThe Activity Report allows you to view the transaction history of both incoming and outgoing documents. You can access the Activity Report via the Reports top menu option.
When selecting the Activity Report menu option you will be presented with a window listing the report filtering options available. These will help you narrow the report down to only the documents you're interested in. The filter options will default to showing the last 24 hours of activity. You can leave it at that or you can click on the drop down button next to the end date to select a pre-defined range. 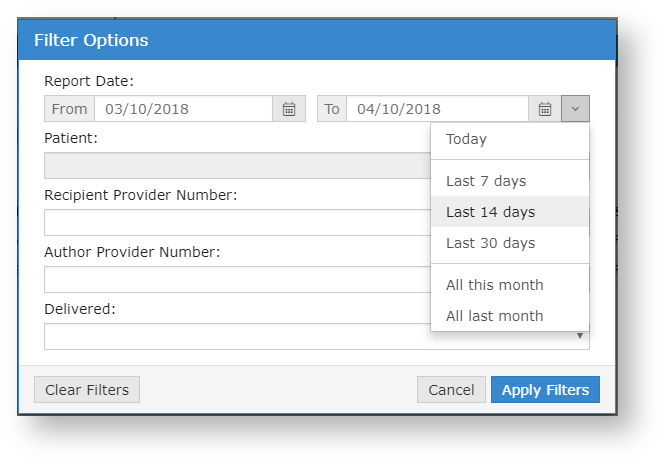 Understanding the report
Viewing documents in the reportYou can view a single document by clicking on the view document icon (
From this window you can perform various actions on the single document such as print, forward or loading the patient file via the All Documents button. You can also navigate to other documents via the back and forward buttons in the top right. Bulk ActionsYou can select multiple documents in the grid and then perform an action on the selection. Currently the bulk actions available are;
|

| Table of Contents | ||||
|---|---|---|---|---|
|