Overview
This guide provides an overview on how to set up your word document template for the Medical-Objects Word Plug-in. For more advanced templates or design assistance, please contact Medical-Objects for support on (07) 5456 6000.
Template construction for Word Plugin
When creating your templates in Medical-Objects Word Plug-in, there are a few guidelines to follow in order to make sure the letter is able to be recognised by the receiving practice management software (PMS). The receiving practice management software will often only import free text format successfully, therefore we have provided a guide to help with the design of your templates.
What to avoid when designing templates:
Do not use Headers and Footers or floating text boxes.
Do not use images, business logos or icons in your letter.
Do not use watermarks as they will cause issues sending, and display incorrectly inside practice software.
There is a high chance that these objects will not be recognised by the receiving Practice Management System (PMS).
Template Design
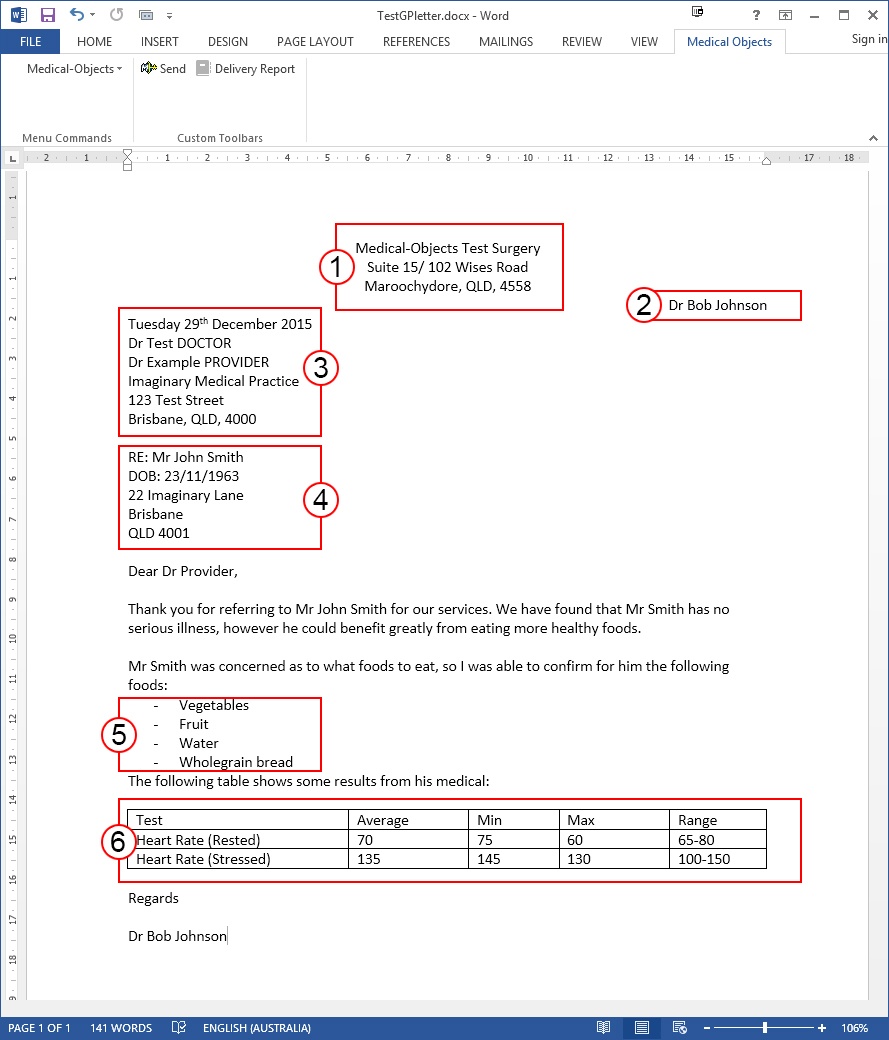
The following template shows the various techniques used to display your letters. Each technique used in the following screen shots will be numbered from 1 to 6.

- The center, left or right align tool on the Microsoft Word toolbar can be used to create your free text header as shown above.
- The right align tool was used to display the practice providers. If the provider number is displayed in the letter, Medical-Objects Word Plug-in will detect it and enter it into the Reports Details screen.
This will be shown in Template design in Microsoft Word.
The providers name and number must be displayed in order for the Word Plug-in to detect it. If there is more than one provider, Word Plug-in will use the first number detected that is stored in the routing for the practice; therefore if your practice has more than one provider you may need to select the correct doctor from the drop down box in the Report Details screen or list a single provider in the template letter head. - The Left align tools was used to display the receiving practice details. If the recipient’s provider number is displayed, Medical-Objects Word Plug-in will detect the receiving provider’s number and add it to the Report Details. In order to detect the receiving providers details, the Word Plug-in will scan the template letter for provider numbers that are not associated with the provider numbers in routing for the practice. If any other providers listed after the initial receiving provider they will be added as copy doctors.
If 6 underscores in a row are detected, then the content above this is considered a letter head and not included in the the HL7 that is generated from the RTF. The template must contain Re:[Patient Name] and DOB:[Patient date of Birth] This will enable you to automatically populate the report details screen. This is also required to validate the document for sending.
The words 'Patient details' (case insensitive) tell the program where to start looking for the keywords Re: (Or the other keywords below). If you have 'Patient details' in the body of the report after the Re: (Or the other keywords below) then the patient details will most likely operate incorrectly.
The following case sensitive words or parts of words will also trigger the import of patient details:
Name
REPORT
Patient
MEDICAL ASSESSMENT
If these values are found in the document before the RE: then the patient detail import will most likely operate incorrectly.- Bullet points can be used to format your text, the receiving software will recognise the different types of bullets.
- Simple tables can be used in your letter. Some practice management software's will not show the table, but the data in the table will still hold its formation.
If you use tabs, tab stops should be used; the standard tab method will not hold formatting after the transmission into the receiving PMS. Tab Stops can be set on the Microsoft Word ruler. |
The Report Details Screen
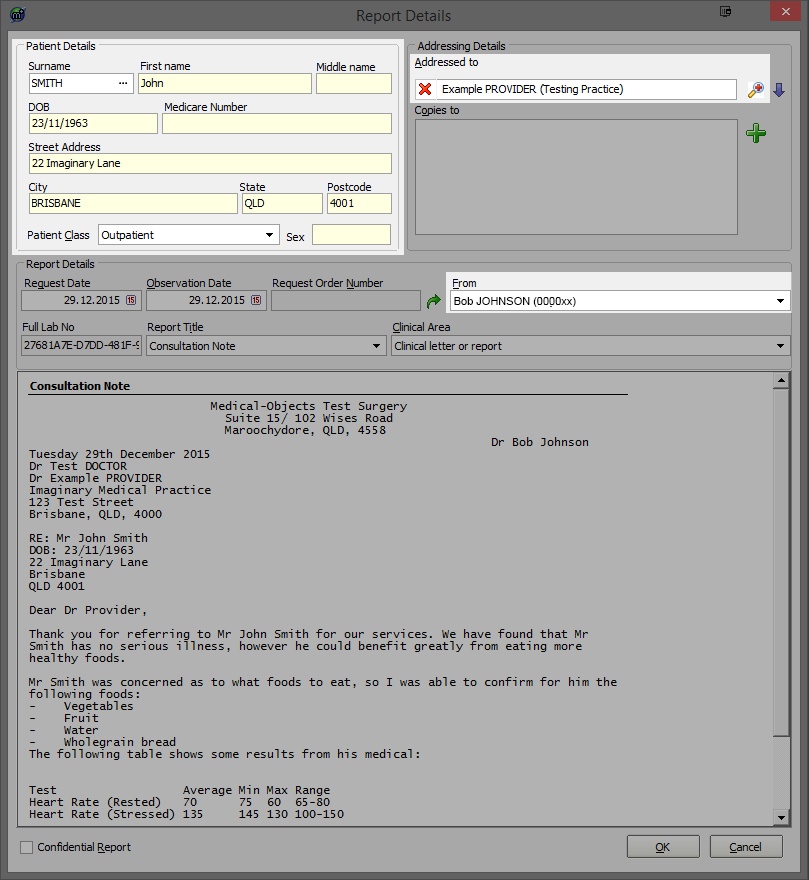
Once you have selected Send in Word Plug-in the Report Details screen will be displayed.

This section will now explain how the layout of your template can reduce the time required to send letters.
Patient Details: You will notice the patient details have been inserted into the report details screen automatically.
If the Patient name follows the identifier RE: the report details screen will automatically insert the details in to the report for you.
If the Patient date of birth follows the DOB: the report details screen this will also will automatically insert the details in to the report for you.
The address details will also be added to the report if they are placed in the next text line following RE: and DOB:
Addressing Details: The provider you are sending to will be displayed in the A̲ddressed To box, if you place their details correctly with provider number as shown in the design stage of the template. If any other providers listed after the initial receiving provider they will be added in the Co̲pies To box.
F̲rom: The report details screen has automatically selected the sending provider that was displayed in the template design section. If there is more than one provider at the practice this may not display correctly so you can use the drop down box to display the correct sending doctor. You can also set a default provider for this field. See this Guide.
Report Details Screen
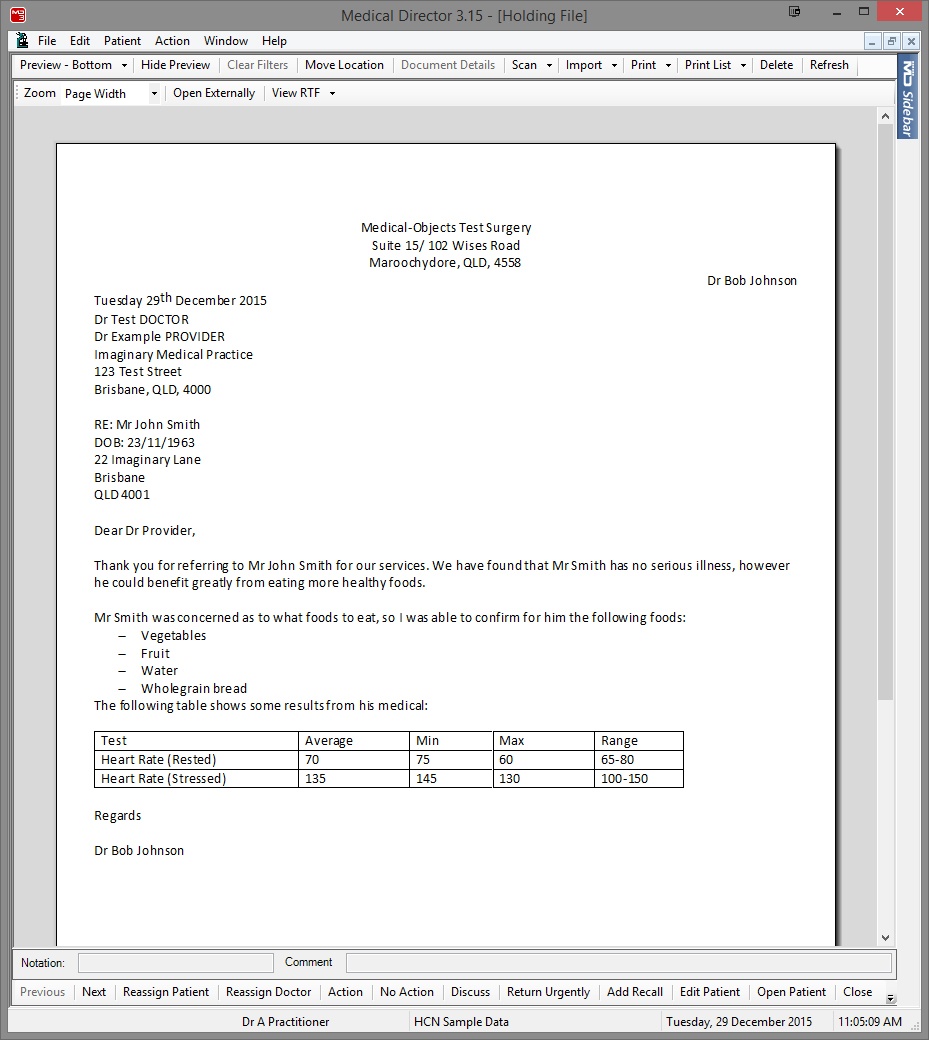
Template Result displayed in Medical Director 3.7

The letter template that we previously created holds its formatting. The table is also visible in this software.