If you're looking for the full user guide please see this page. |
Overview
This article will cover the basic functionality of Medical-Objects Explorer Online when running in Results Online mode. If you have any questions or require any further information, please contact the Helpdesk on (07) 5456 6000.
Sidebar
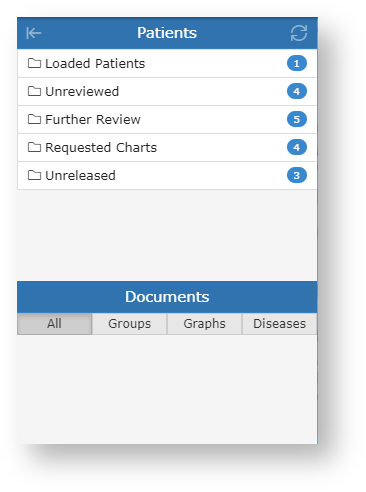
The Sidebar is a feature that allows you to access and manage your patient documents. The Sidebar is split into two sections: Patients and Documents.
If you're using Explorer Online on a smaller screen you have the option to collapse the sidebar by clicking the collapse icon ![]() found on the left side of the Patients header. You can then expand the Sidebar again by clicking the
found on the left side of the Patients header. You can then expand the Sidebar again by clicking the ![]() icon.
icon.

Patients
The Patients section of the Sidebar consists of individual folders which contains patient documents. The folders will list each unique patient that has a document for that folder. The count to the right is the amount of patients in the folder and not the amount of combined documents.
Hovering over a folder will reveal a grid icon (![]() ). This button will load all the documents in that folder into a grid. From there you can then perform bulk actions on the documents such as printing or forwarding to another provider.
). This button will load all the documents in that folder into a grid. From there you can then perform bulk actions on the documents such as printing or forwarding to another provider.
To refresh the contents of the folders simply click the refresh button (![]() ) in the title bar.
) in the title bar.
| Loaded Patients | Contains any patients you've done a lookup on or retrieved all documents for. You can remove a patient from this list by clicking the remove icon ( If you want to clear the folder and remove all patients you can click on the clear icon ( |
|---|---|
| Unreviewed | Contains patients that have unreviewed documents. Selecting documents from this folder will give you the option to mark the document as reviewed. A Max of 50 unreviewed documents will appear in the list. To see new results you must mark results as reviewed once they have been actioned. |
| Further Review | Contains patient documents that have been parked. A document can be parked by clicking the 'Park' document action button.
Documents in this folder can only be accessed by the provider who made the original 'Park' request. To remove a document from this folder click the 'Unpark' document action button.
|
| Requested Charts | Contains patient documents with the requested chart status. A document can be moved to the Requested Charts folder by clicking the 'Request Chart' document action button.
Any user in your practice’s Explorer Online software, who has the granted permissions to view results, can access documents in this folder. For more information on setting user permissions, see our Explorer Online Admin Guide or please contact the Helpdesk on (07) 5456 6000. Practices can decide how to use this feature in their own workflows. For example, doctors can use this option as a request for staff to gather medical charts after receiving a message on a patient. Another example might be when a doctor receives an eReferral, and then clicks 'Request Chart' so that staff can be ready with the referral on hand prior to a consultation with a patient. Upon completion of the workflow relating to the document, staff can then select the 'Cancel Chart' document action button to remove it from the Requested Charts folder.
|
| Unreleased | Contains patient documents that have not yet been released. Documents in this folder can either be released or deleted.
An unreleased document will have the following red text in the document title to indicate that it has not yet been released.
Unreleased documents are created by ticking the 'For Approval Before Delivered' option when sending a document. |
| Created | Contains a recent list of documents that you have created, This includes both progress notes and documents that you have sent. You can clear this folder by hovering over it and clicking on the Clear Folder button ( |
Documents
The Documents section will list all the documents for the selected patient that correspond to the folder the patient is in. For example if you select a patient in the Unreviewed folder, all unreviewed documents for that patient will be listed.
Hovering over the Documents section will reveal a grid icon (![]() ). This button will load all the documents listed into a grid. From there you can then perform bulk actions on the documents such as printing or forwarding to another provider.
). This button will load all the documents listed into a grid. From there you can then perform bulk actions on the documents such as printing or forwarding to another provider.
Abnormal results will show as red in the documents list.
