Overview
This section includes instructions for setting up the Medical-Objects Capricorn for sending through VIP.net. This step is designed to be included in the Capricorn configuration for VIP.net Here.
If you require any assistance with the installation or configuration, or if you have any questions, please contact the Medical-Objects Helpdesk on (07) 5456 6000.
If you have not Installed the Medical-Objects Download client, Please see the guide for Installing Capricorn on Windows.
Configuring Capricorn Software
Accessing the Capricorn Configuration Window
| Info | ||
|---|---|---|
| ||
In some cases, the Capricorn may be configured as a service. See this guide for instructions on how to launch the Capricorn if it is set up as a service. |
| Excerpt Include | ||||||
|---|---|---|---|---|---|---|
|
Capricorn Configuration Settings
Click on Manage Queues in the left hand side panel.
Click Add.
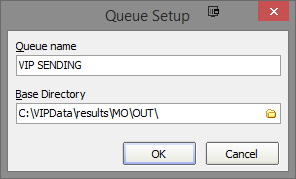

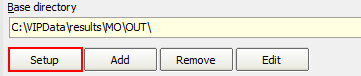
No Format Set the Queue name to VIP SENDING If on a workstation, Set the Base Directory to to CC:\VIPDataMO\resultsResults\MOVIP\OUTOutgoing\ Or if on a server, set the Base Dirctory to \\Server\VIPData\results\MO\OUT\\MO Results\VIP\Outgoing\ (Where Server is the DNS name of the machine that has the MO Results share which correlates to C:\MO\Results\VIP\Outgoing\)
Info title Note: Please note that the Base Directory location can change, depending on where your version of VIP.net is installed to.
Click the OK button to save.- Click the setup button.

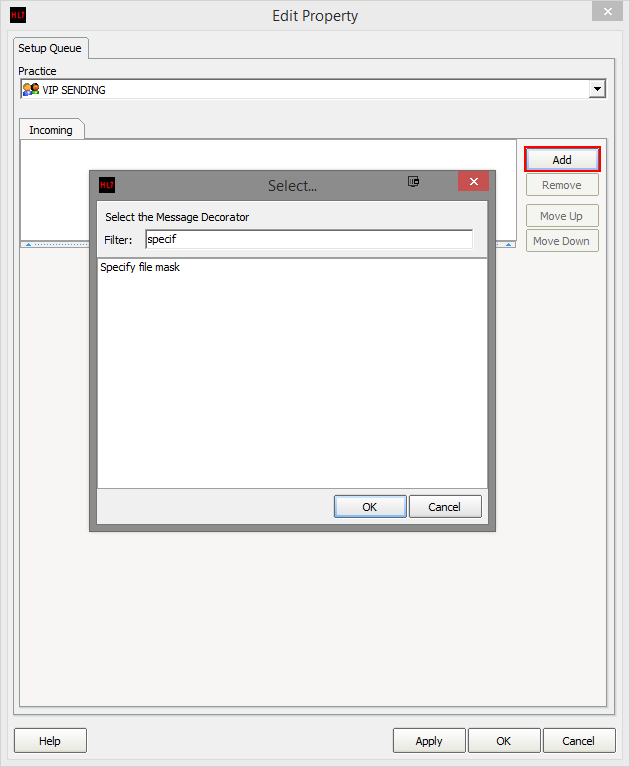
Click the Add button and search for Specify File Mask.
Set the file mask to *.* (All Files)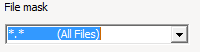
Add the following decorators using the previous steps.
Move Acks to Application ACK Folder.
Modify Message with HL7 Script
Code Block language delphi //VIP.net currently doesn't populate MO IDs in the correct fields. program VIPMOIDs; var i: Integer; recipient: string; begin for i := 0 to HL7Data.SegmentCount - 1 do begin if SameText(HL7Data.SegmentName[i], 'MSH') then begin recipient := HL7Data.GetFieldValue(i, 5, 0, 0, 0); break; end; end; if ValidateMedicalObjectsID(recipient, false) then begin for i := 0 to HL7Data.SegmentCount - 1 do begin if SameText(HL7Data.SegmentName[i], 'PRD') and (SameText(HL7Data.GetFieldValue(i, 1, 1, 0, 0), 'IR') or SameText(HL7Data.GetFieldValue(i, 1, 2, 0, 0), 'IR')) then begin HL7Data.SetFieldValue(recipient, i, 7, 0, 0, 0); end; if SameText(HL7Data.SegmentName[i], 'PV1') then begin HL7Data.SetFieldValue(recipient, i, 9, 0, 0, 0); end; end; end; end.
Override Sender HD fields to This Value
Convert REF Message to ORU Format
Route with CapricornInfo title Note: Please note that for the Override Sender HD Fields to This Value decorator, You will need to contact Medical-Objects to obtain the Practice Identifier details.
Click the Apply and OK buttons to save your settings.
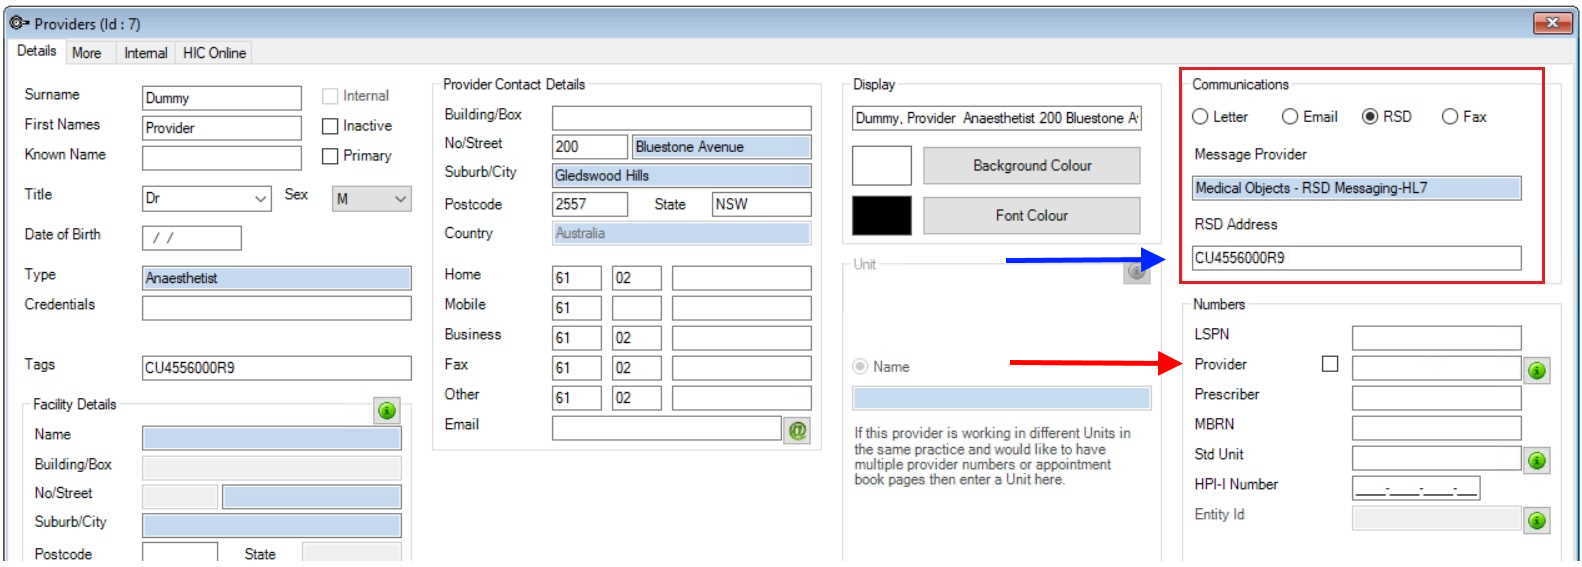
Address book entries
Provider Numbers
If the recipient has a provider number enter it into both fields indicated by the arrows.
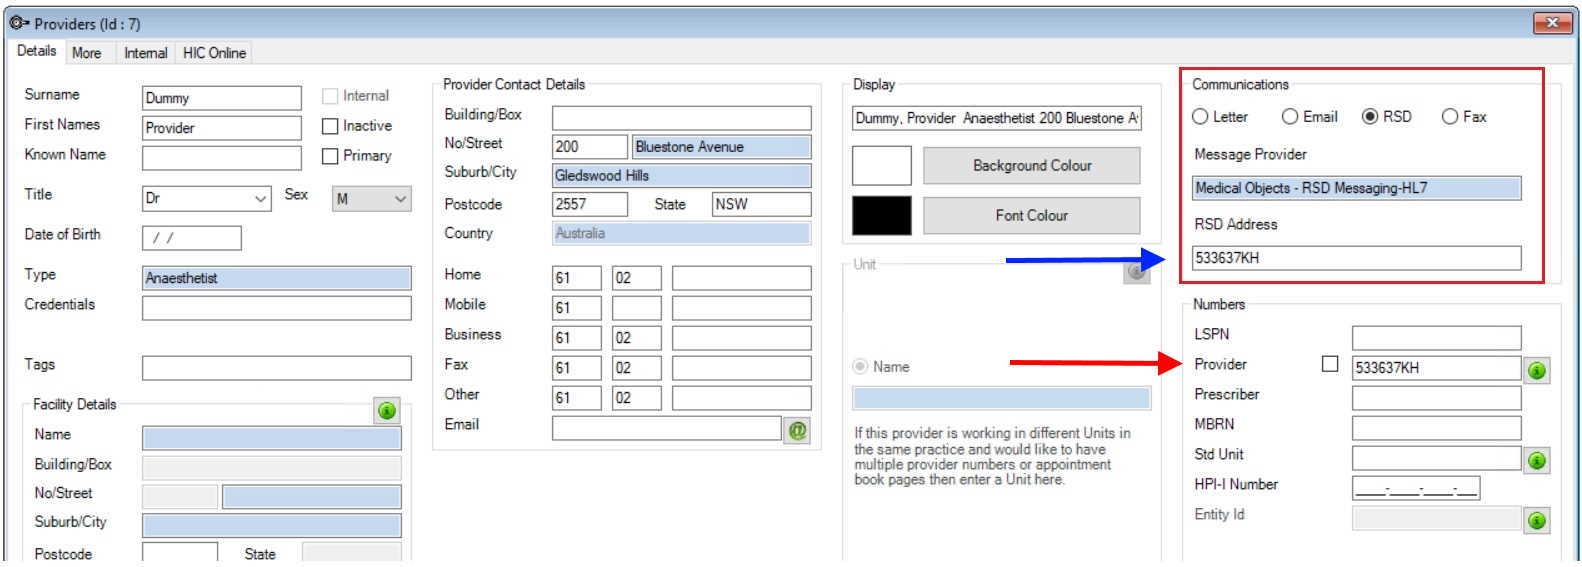
MO Routing IDs
If the recipient doesn't have a provider ID and you need to use an MO Routing ID then you can only fill in the value for the blue arrow. The red arrow field can be left blank.
Sending
- Create Template; Setup → Letter Templates
- New (Bottom Left) → Set Template Name
- New (Bottom Left) → Set Template Name
- Create footer on blank Template
- Insert (Top) → Header-Footer

- Insert (Top) → Header-Footer
- Create a Table within the Footer
- Insert Table
 → Set Rows (1), Columns (3)
- In first column type “Copy to”
- Press save and close (Top Left)

- Insert Table
- Setup → Letter Templates
- Select your Template → Options (Bottom) → Recipients → Select Multiple Providers → Press ok

- Patient → Outgoing Communication (F4)

- Press New (Top Right)

- Select either Correspondence or Referral
- Press New (Top Right)
- Select Created Template from Options on the left → Give your Document a name

- Letter Recipients screen should appear → Press Cancel

- Letter Recipients screen should appear → Press Cancel
- Press F4 or navigate through steps to get back to Outgoing Communication
- Ensure Correspond, Outgoing and Referral are selected on the right.

- Select your report from the list above and press Edit (Top Right)
- Ensure Correspond, Outgoing and Referral are selected on the right.
- Press edit details

- Ensuring the Sending Provider and Receiving Provider are filled by typing on text boxes

- Both Providers must have RSD enabled and the RSD details need to be filled out with Medical-Objects details as per Address Entries guide below.
- Both Providers must have RSD enabled and the RSD details need to be filled out with Medical-Objects details as per Address Entries guide below.
- Press Print/Send
- Print Lock
- Select Recipient and make sure their RSD option is selected

- Press Ok

| Table of Contents | ||||
|---|---|---|---|---|
|