Overview
Provide a simple worked example for the MO Template Editor.
An apple example
- Remember to have downloaded the latest MO Template Editor from Free Version of Template Editor
- Run it and the following window will appear.
 Image Removed
 Image Added
- Now step back from the keyboard and get a pen and paper! First step is to note down the structure of the object you wish to build an archetype for. In this case we will consider an apple object. It has features such as colour, price, type, weight. How would you structure this? What data types would these attributes have? A simple mind mapping tool can be helpful at this stage:
 Image Removed
 Image Added
 - To build this as an EN 13606 archetype, start by clicking on the New Archetype button
 Image Removed
  Image Added. Give it a name. How about 'CEN13606-Apple.v1'. Unfold the archetype by clicking on the Fold/Unfold part of the Tree View - +. Highlight the Definition part of the tree by left clicking on it, then right click , then click on the Add Data Group button in the menu
  Image Removed
  Image Added. Unfold Definition again and you can see the new and yet to be named CLUSTER. On the right hand side pane (RHS), find where it says OpenEHRName. Type 'ENTRY' in the adjacent pane.
 Image Removed
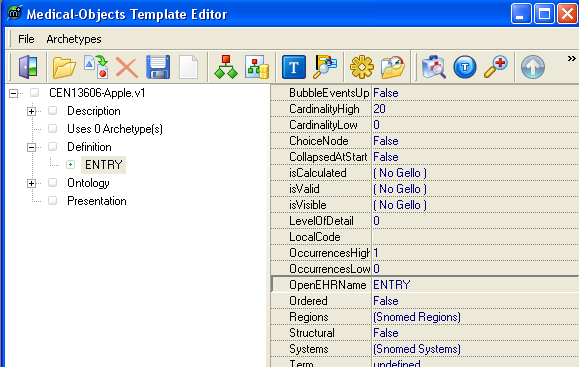 Image Added
Click back in the tree in the Tree View on the left hand side pane again, for example on Definition. Left click now on ENTRY, then right click it, then click on the Add Local Term button  Image Removed
  Image Added. Call it 'Apple', then ok. We need to make the local code identifier to be 'at0000' for the LocalCode tag in the RHS. Then just type over the field containing 'at0005' in the Ontology pane at the bottom of the screen. Double click on the value to ready it for editing. (If the LocalCode value for the text 'Apple' is something else just make it at0000.)
- Highlight the ENTRY part of the tree again by left clicking on it, then right click , then click on the Add Element button in the menu
 Image Removed
  Image Added. Unfold ENTRY again and you can see the new and yet to be named ELEMENT. Left, then right click on ELEMENT, then click on the Add Local Term button Image Removed Image Added. We'll put 'Colour' here. In a similar way add 'Cost' and 'Weight' as ELEMENTS. Leave their type as the default 'Any data' setting.
(NB: - added 21/8/09 - To be 100% correct we probably need an items cluster underneath ENTRY to be fully compliant with a reference model that wants OBJECT-attribute-OBJECT-attribute. To do this do as before with ENTRY but type items where it says openEHRName on the RHS. It works without it though.)
- Add a CLUSTER (by using the Add Data Group button on the right click menu) to ENTRY, as we have grouped ELEMENTS under 'variety notes' in the mind map. To the CLUSTER, add the final two ELEMENTs and name them all. The archetype should now look like this:
 Image Removed
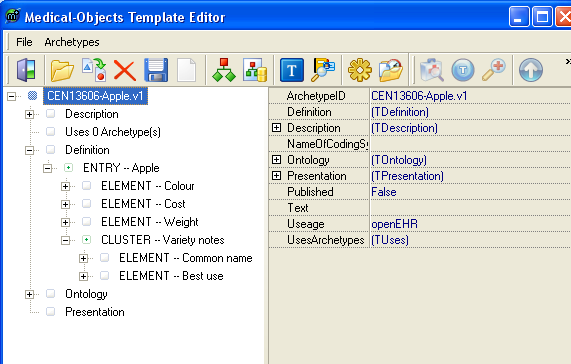 Image Added
- Now we can add some datatypes. The choices for colour will come from the list shown in the mindmap. Here's how we can do it. First click on the ELEMENT named 'Colour' in the Tree View, then move over to set the ADLMatchType in the RHS to mtReferenceSection by clicking on the adjacent pane to the tab name in the RHS and then on the down arrow that appears on the right of the box.
 Image Removed
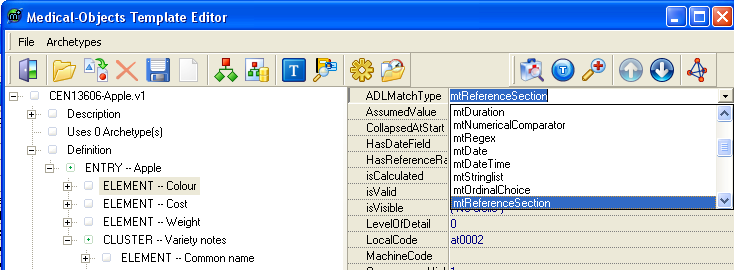 Image Added
Unfold the Colour ELEMENT node'(nodes are points in the tree identified uniquely with an atCode). Note a child concept has appeared called ReferenceSectionData. Click on this and on the RHS see the default tags which reading from top to bottom describe the allowing of textual values (like a CE HL7 datatype); the Choices tag - we'll come back to this; Default Index - don't worry about it; Display style allows display options including horizontal and vertical radio buttons; and (any) mapped HL7 datatypes.
To add the pull down menu choices, we first add them as nodes to the archetype, but not directly in the view of the structure shown in Tree View. Look at the Ontology pane at the bottom of the editor. window. See how term definitions are being built up as we go. We will deliberately add new terms now. Click on the Edit terms button back up in the menu at the top of the window  Image Removed
  Image Added. Click on the blue 'plus sign' button next to TermDefinitions. A new row describing a node identifier called an atCode or in this case a LocalCode, appears. Complete the details, putting 'en' for English if that's your language, 'Green' for the Text and Description, and that's all. Click in another row to save the changes, and repeat for the colour 'Red'.
 Image Removed
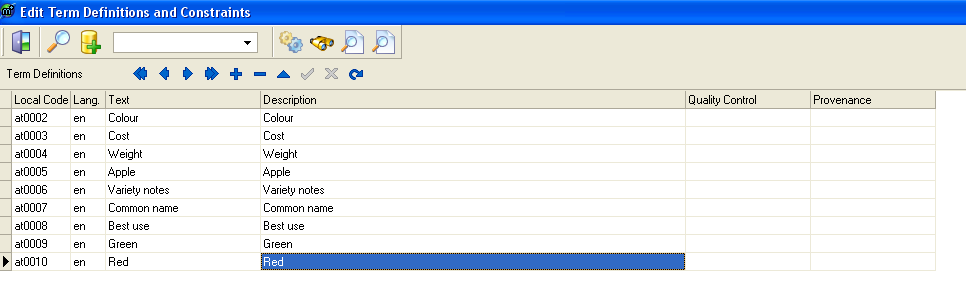 Image Added
Close this window by clicking on the little door icon on the top left  Image Removed
  Image Added. Back in the Tree View, unfold the node named 'Colour' if necessary, click on ReferenceSectionData, then on the RHS, click on (Codes) in the box adjacent to Choices, then on the
  Image Removed
  Image Added button. In the Selected codes or restraints window that appears, click on the
  Image Removed
  Image Added button, find the term 'Green', then do the same for 'Red' and ok out.
 Image Removed
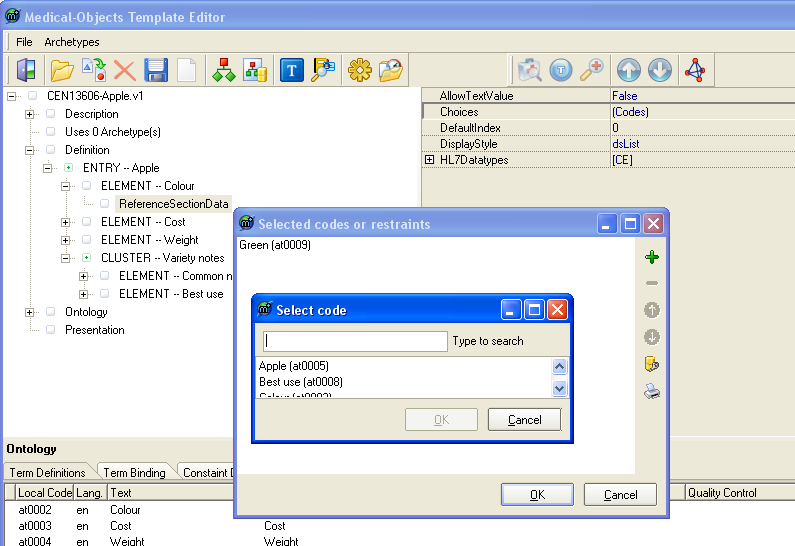 Image Added
Check on how things are looking by clicking on the Preview Archetype in editor button  Image Removed
  Image Added.
 Image Removed
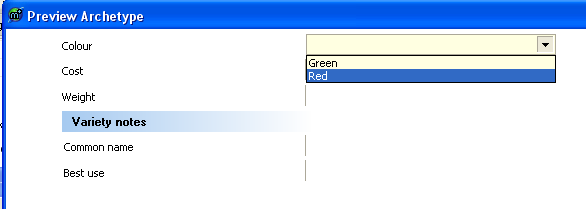 Image Added
Close this and save your work. Do the same thing to create the choices for the node 'Common name'.
Lets look at the other nodes: 'Weight' is a Physical Quantity (PQ). The ADLMatchType for this on the RHS is mtQuantity. When you have created the 'child' node called QuantityData back in the Tree View, right click on this again, choose New Child and click on that. In the RHS type 'g' for grams in the box next to Units. In preview mode you can see that units of g are now present in the archetype/template. You can treat dollars as a PQ and do so for the 'Cost' node. Let it have two decimal places. To wrap up the datatypes for our apple archetype, make the node 'Common name' be of type mtReferenceSection like the node 'Colour' and refresh your memory from earlier in this section on how to add the appropriate new allowable choice terms and then do so.
- Local terms may be bound to one or more terminologies, such as LOINC and SNOMED-CT. Here's how to do it. Let's assume you have a license for SNOMED-CT. Click somewhere in the archetype tree in Tree View. Then click on the Edit terms button Image Removed Image Added. Click on the row that contains the term 'Green'. Now click on the plus sign in the pane below. Double click in the Terminology pane and type 'SNOMED-CT', then next to it under Code, type '371246006', then 'Green' under Text. If you type a different value for text it will change the archetype's local term to be that term.
 Image Removed
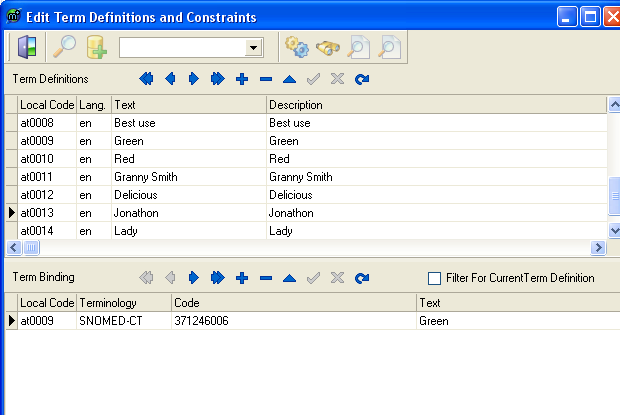 Image Added