Overview
This guide provides instruction on configuring both Medical-Objects Capricorn and Practix software to import electronic results.
If you require any assistance with the installation or configuration, or if you have any questions, please contact the Medical-Objects Helpdesk on (07) 5456 6000.
If you have not Installed the Medical-Objects Download client, Please see the guide for Installing Capricorn on Windows.
Configuring Capricorn Software
Accessing the Capricorn Configuration Window
- To launch the HL7 Tray application, Go to Start Menu, All Programs, Medical-Objects and select the Medical-Objects Capricorn. Alternatively, You can go to C:\MO\Capricorn and run the Capricorn.exe.
- The following icon will appear in the tray. Double click on it to bring up the log window.

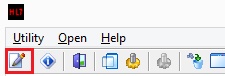
- When the log window is displayed, Click on the Configuration icon highlighted below, or select Utility and select Configuration.
Integration Options
From the left hand panel, Select Integration Options.
Set the Folder for ACKS to the folder Practix will be outputting them to - Typically C:\msp\resultsimport\ACKs. The same import path will need to be added to a contact in Practix, outlined later in this guide.
Make sure at the bottom of the panel that under Incoming Modifier, The Practix HL7 Modifier is set as shown below.
Report Scanning
In the left hand panel, Select Report Scanning.
In the Report Scanning window, set the path to create a MO-Images folder in the same path as the ACKs folder as shown below.
Once you have typed in the path, a message window will pop up and ask if you want to create the path.
Select OK to create the path.
Message Source Exceptions
Select Message Src Exceptions from the left hand panel of the Capricorn configuration window.
Click Add as shown above, and select Lookup Sending Facility HD. Do not use any other selection.
A new window will appear called Select Identifier.
Enter Southern and press Enter or click the Lightning Bolt to search.
Select Southernex Imaging from the display panel.
The following Message Source Exception window will appear.
Click OK to leave all the details blank.
Repeat this step for each of the Pathology and Radiology sites that send to the Practice.(e.g. In this case QHPS (Nata 2639) and Southernex Imaging).
Server Parameters
- In the left hand side panel, select Server Parameters.
In Message Output Directory (main) Enter the path for the Download client to drop off results to. Typically, this is C:\msp\resultimport.
Practix Configuration
Adding a Contact for Medical-Objects
- Open up the Practix Software.
- Click Administration.
- Select System Configuration then select Contacts and Contacts again.
- Click Enter.
- Once you have clicked Enter the following window will appear.
- Perform a search for Medical-Objects. If the entry exists, click on Medical-Objects and then click Select, otherwise click New to create it.
- Select Company and then enter in the details shown in the above window.
- Click the Messages In button on the right hand side.
Once you click Messages In, the following window will appear.
- Enter details the from the above image.
- Once you get to the Message Details area, click on the Add button highlighted on the right hand side.
- Once you have clicked Add, the following window will appear.
- Select ORU^R01-Result as the Message Type then Click OK.
- Click Save on the Receive Message From window.
- Click Close on the Receive Message From window.
- Click OK on the Contact window.
- Click Close on the Find Contact window.
Adding a Radiology Contact
- Perform a search for the Radiology sending facility you are about to add. For example, Southern X-ray. If the Facility exists; click the name and click Select, otherwise click New to create it.
Select Company and then enter in the companies details. When you are finished, click Message In.
Once you have clicked the Message In button, the following window will appear.
- Enter the Radiology Company’s details as shown above. (The drive letter and path may vary depending on the folder location that the practice has designated for imports).
- Click Add to setup the receiving type.
- Select the ORU^R01-Result as the Message Type then Click OK.
- Click Save on the Receive Message From window
- Click Close on the Receive Message From window
- Click OK on the Contact window
- Click Close on the Find Contact window
Adding a Pathology Contact
Perform a search for the Pathology sending facility you are about to add. For example, Queensland Health Pathology Services. If the Facility exists; click the name and click Select, otherwise click New to create it.
Select Company and then enter in the companies details and then click Message In.
Once you have clicked the Message In button the following window will appear.
Enter the Pathology Company’s details as shown above. (The drive letter and path may vary depending on the folder location that the practice has designated for imports).
Click Add to setup the receiving type.
Select the ORU^R01-Result as the Message Type then Click OK.
Click Save on the Receive Message From window.
Click Close on the Receive Message From window.
Click OK on the Contact window.
Click Close on the Find Contact window.
The configuration for Practix is now completed.